
Overview
This documentation outlines the best practices and fundamental concepts for building efficient and reliable automations in UnifyApps, ensuring your workflows run smoothly.
Triggers
A trigger is the starting point of an automation, it's what kicks off the automation process. It occurs when certain events take place, such as receiving an email, updating a database record, or at scheduled times.
Types of Triggers
App Triggers
UnifyApps enables automation based on events from various apps like Gmail, Salesforce, or Zendesk. With connector-based triggers, you can initiate workflows when specific actions occur in these platforms, such as receiving a new email or updating a ticket. Additionally, you can use API triggers or set up scheduled automations to run at regular intervals.
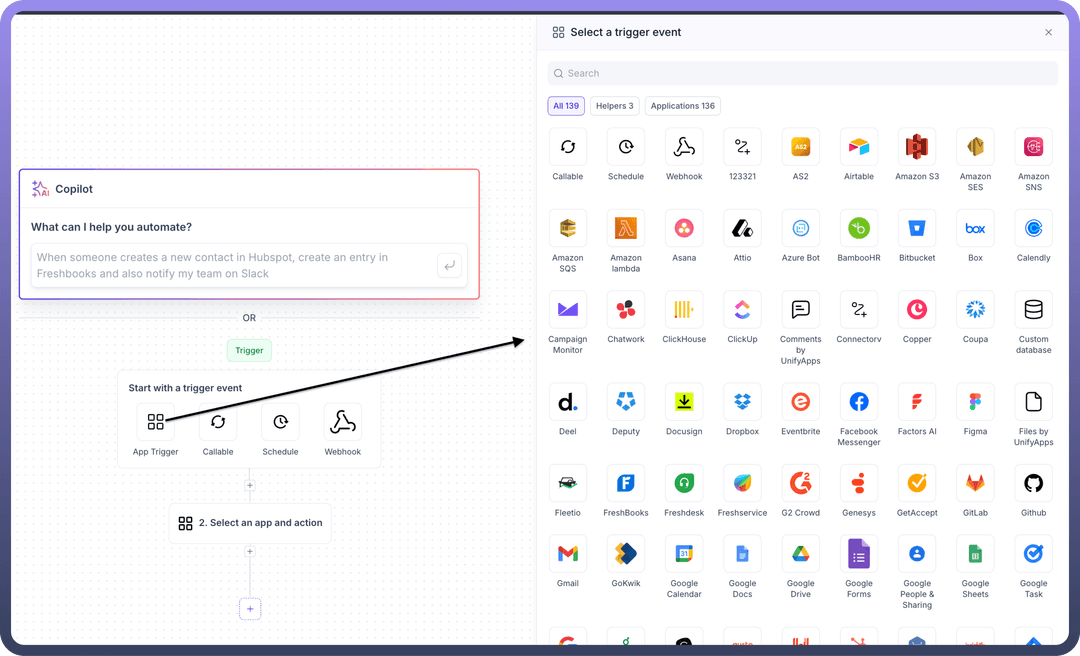
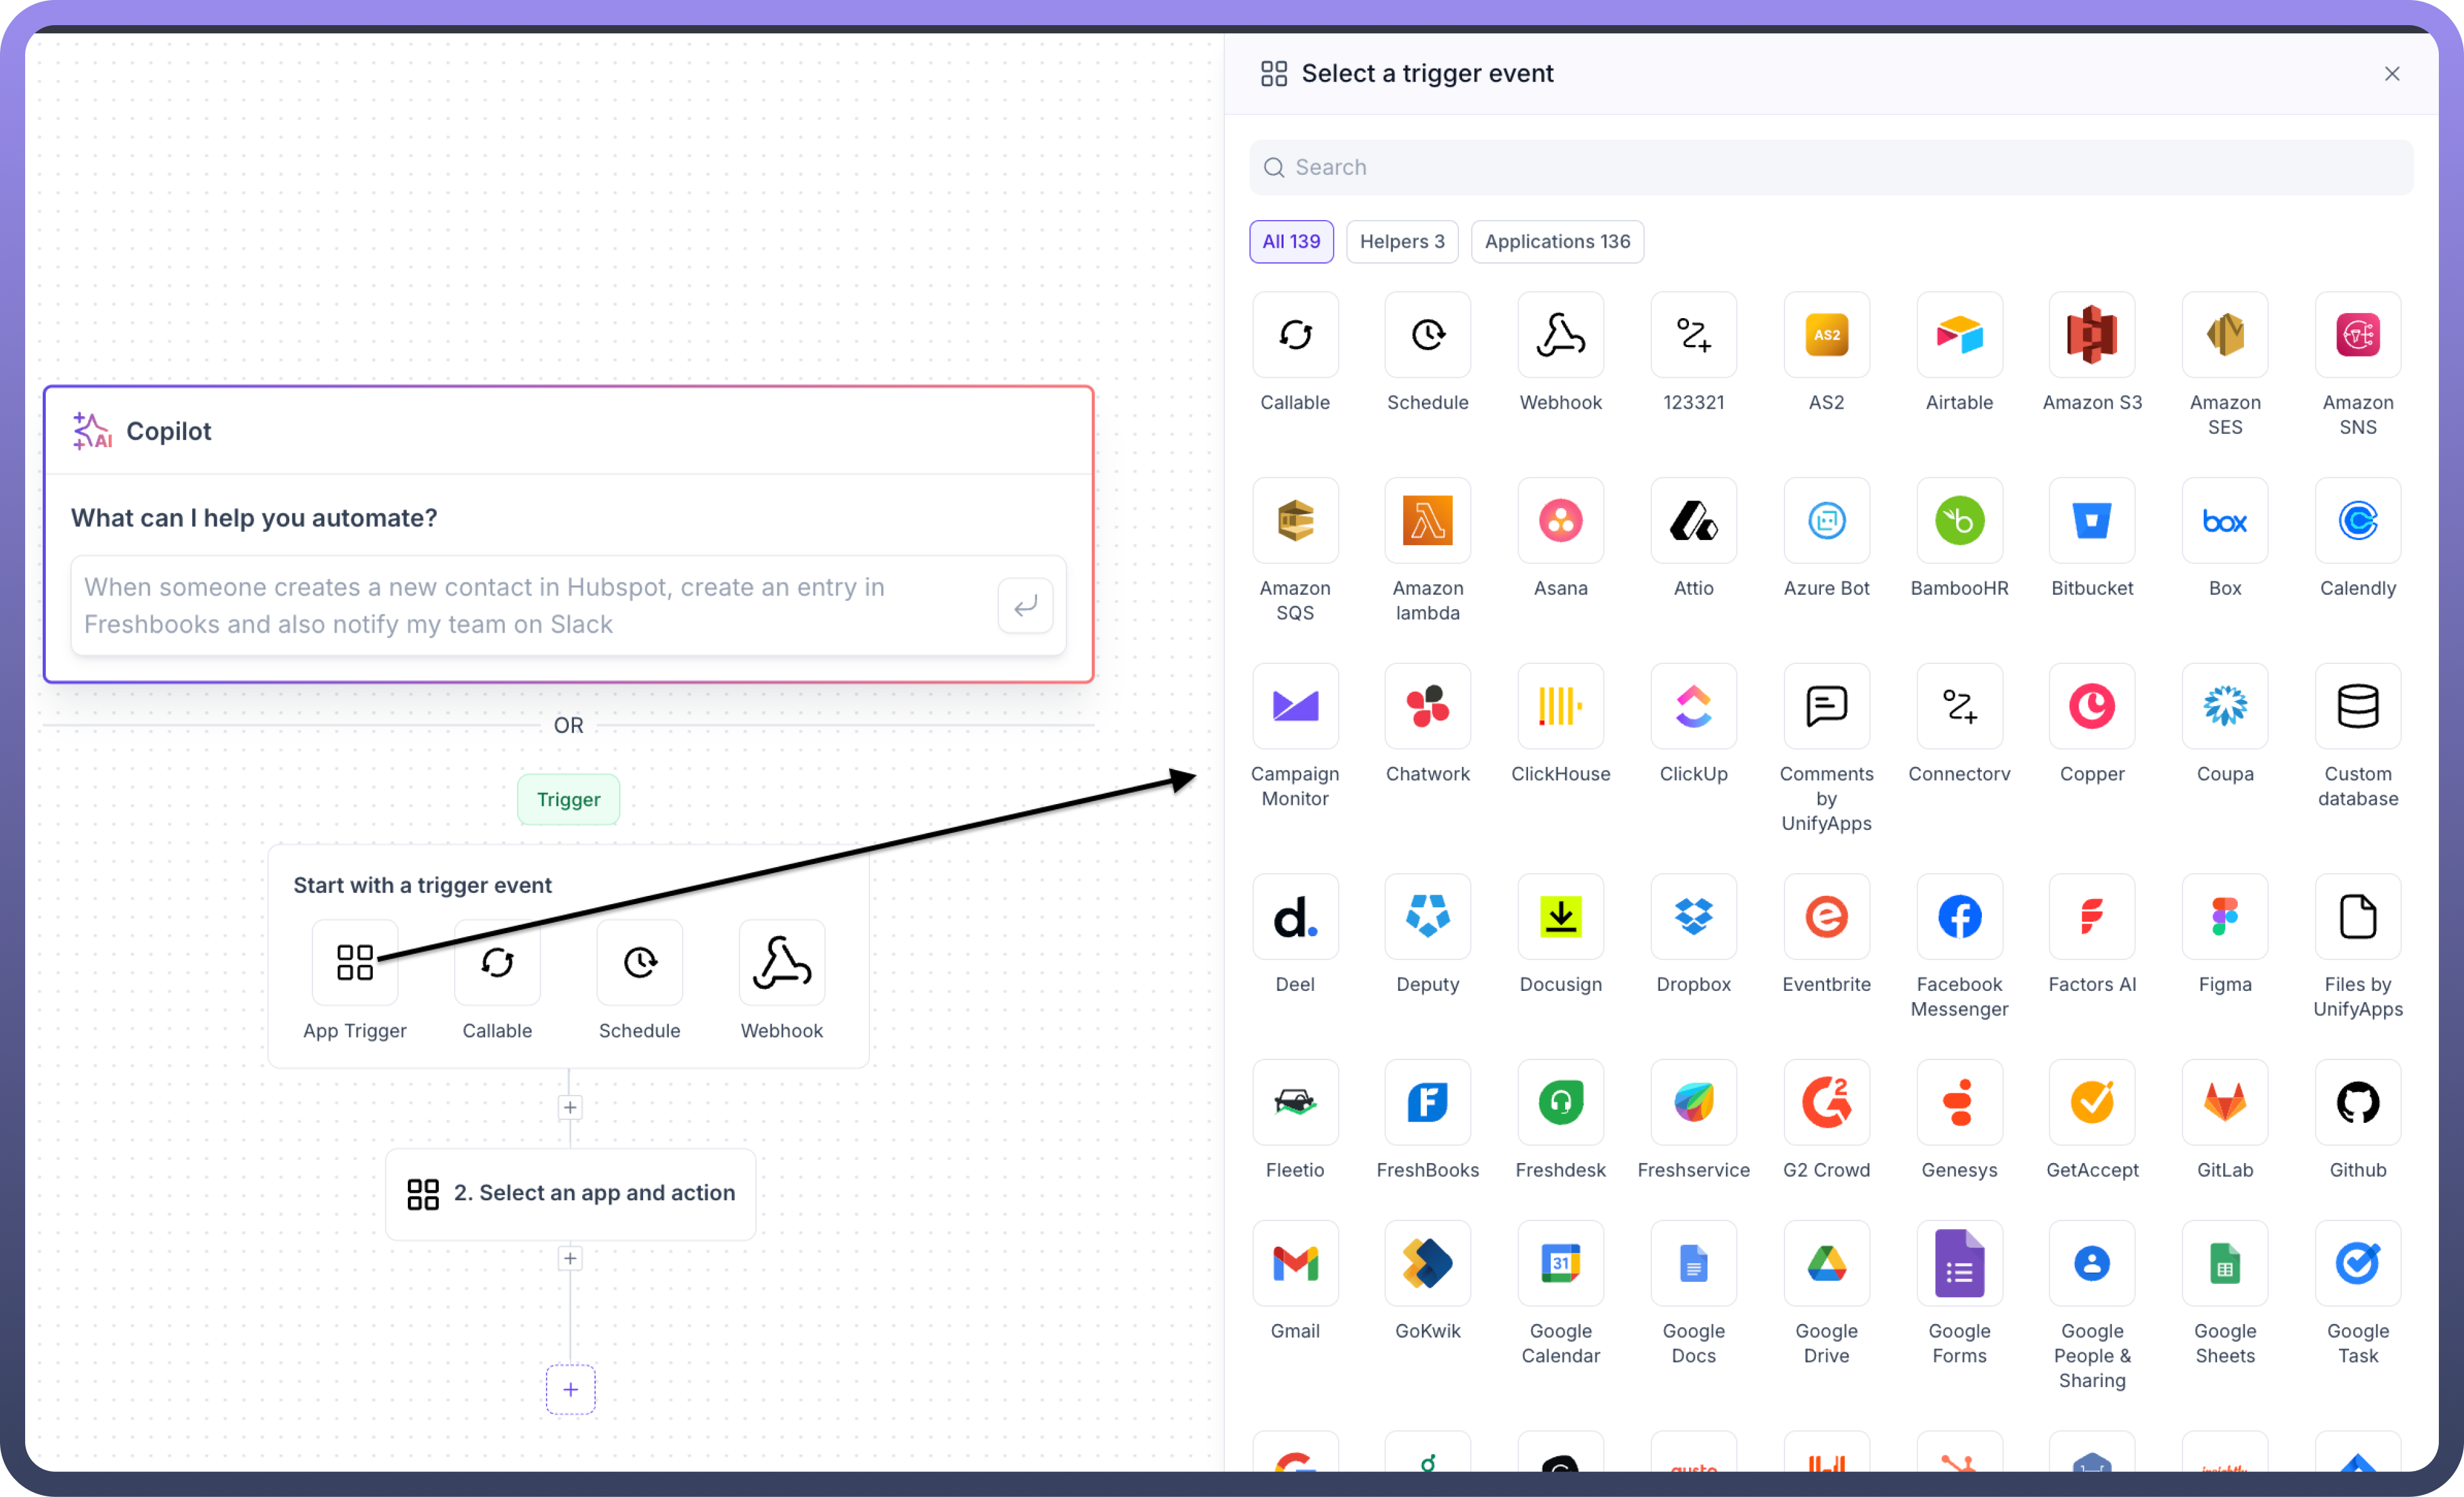
API-Based Trigger
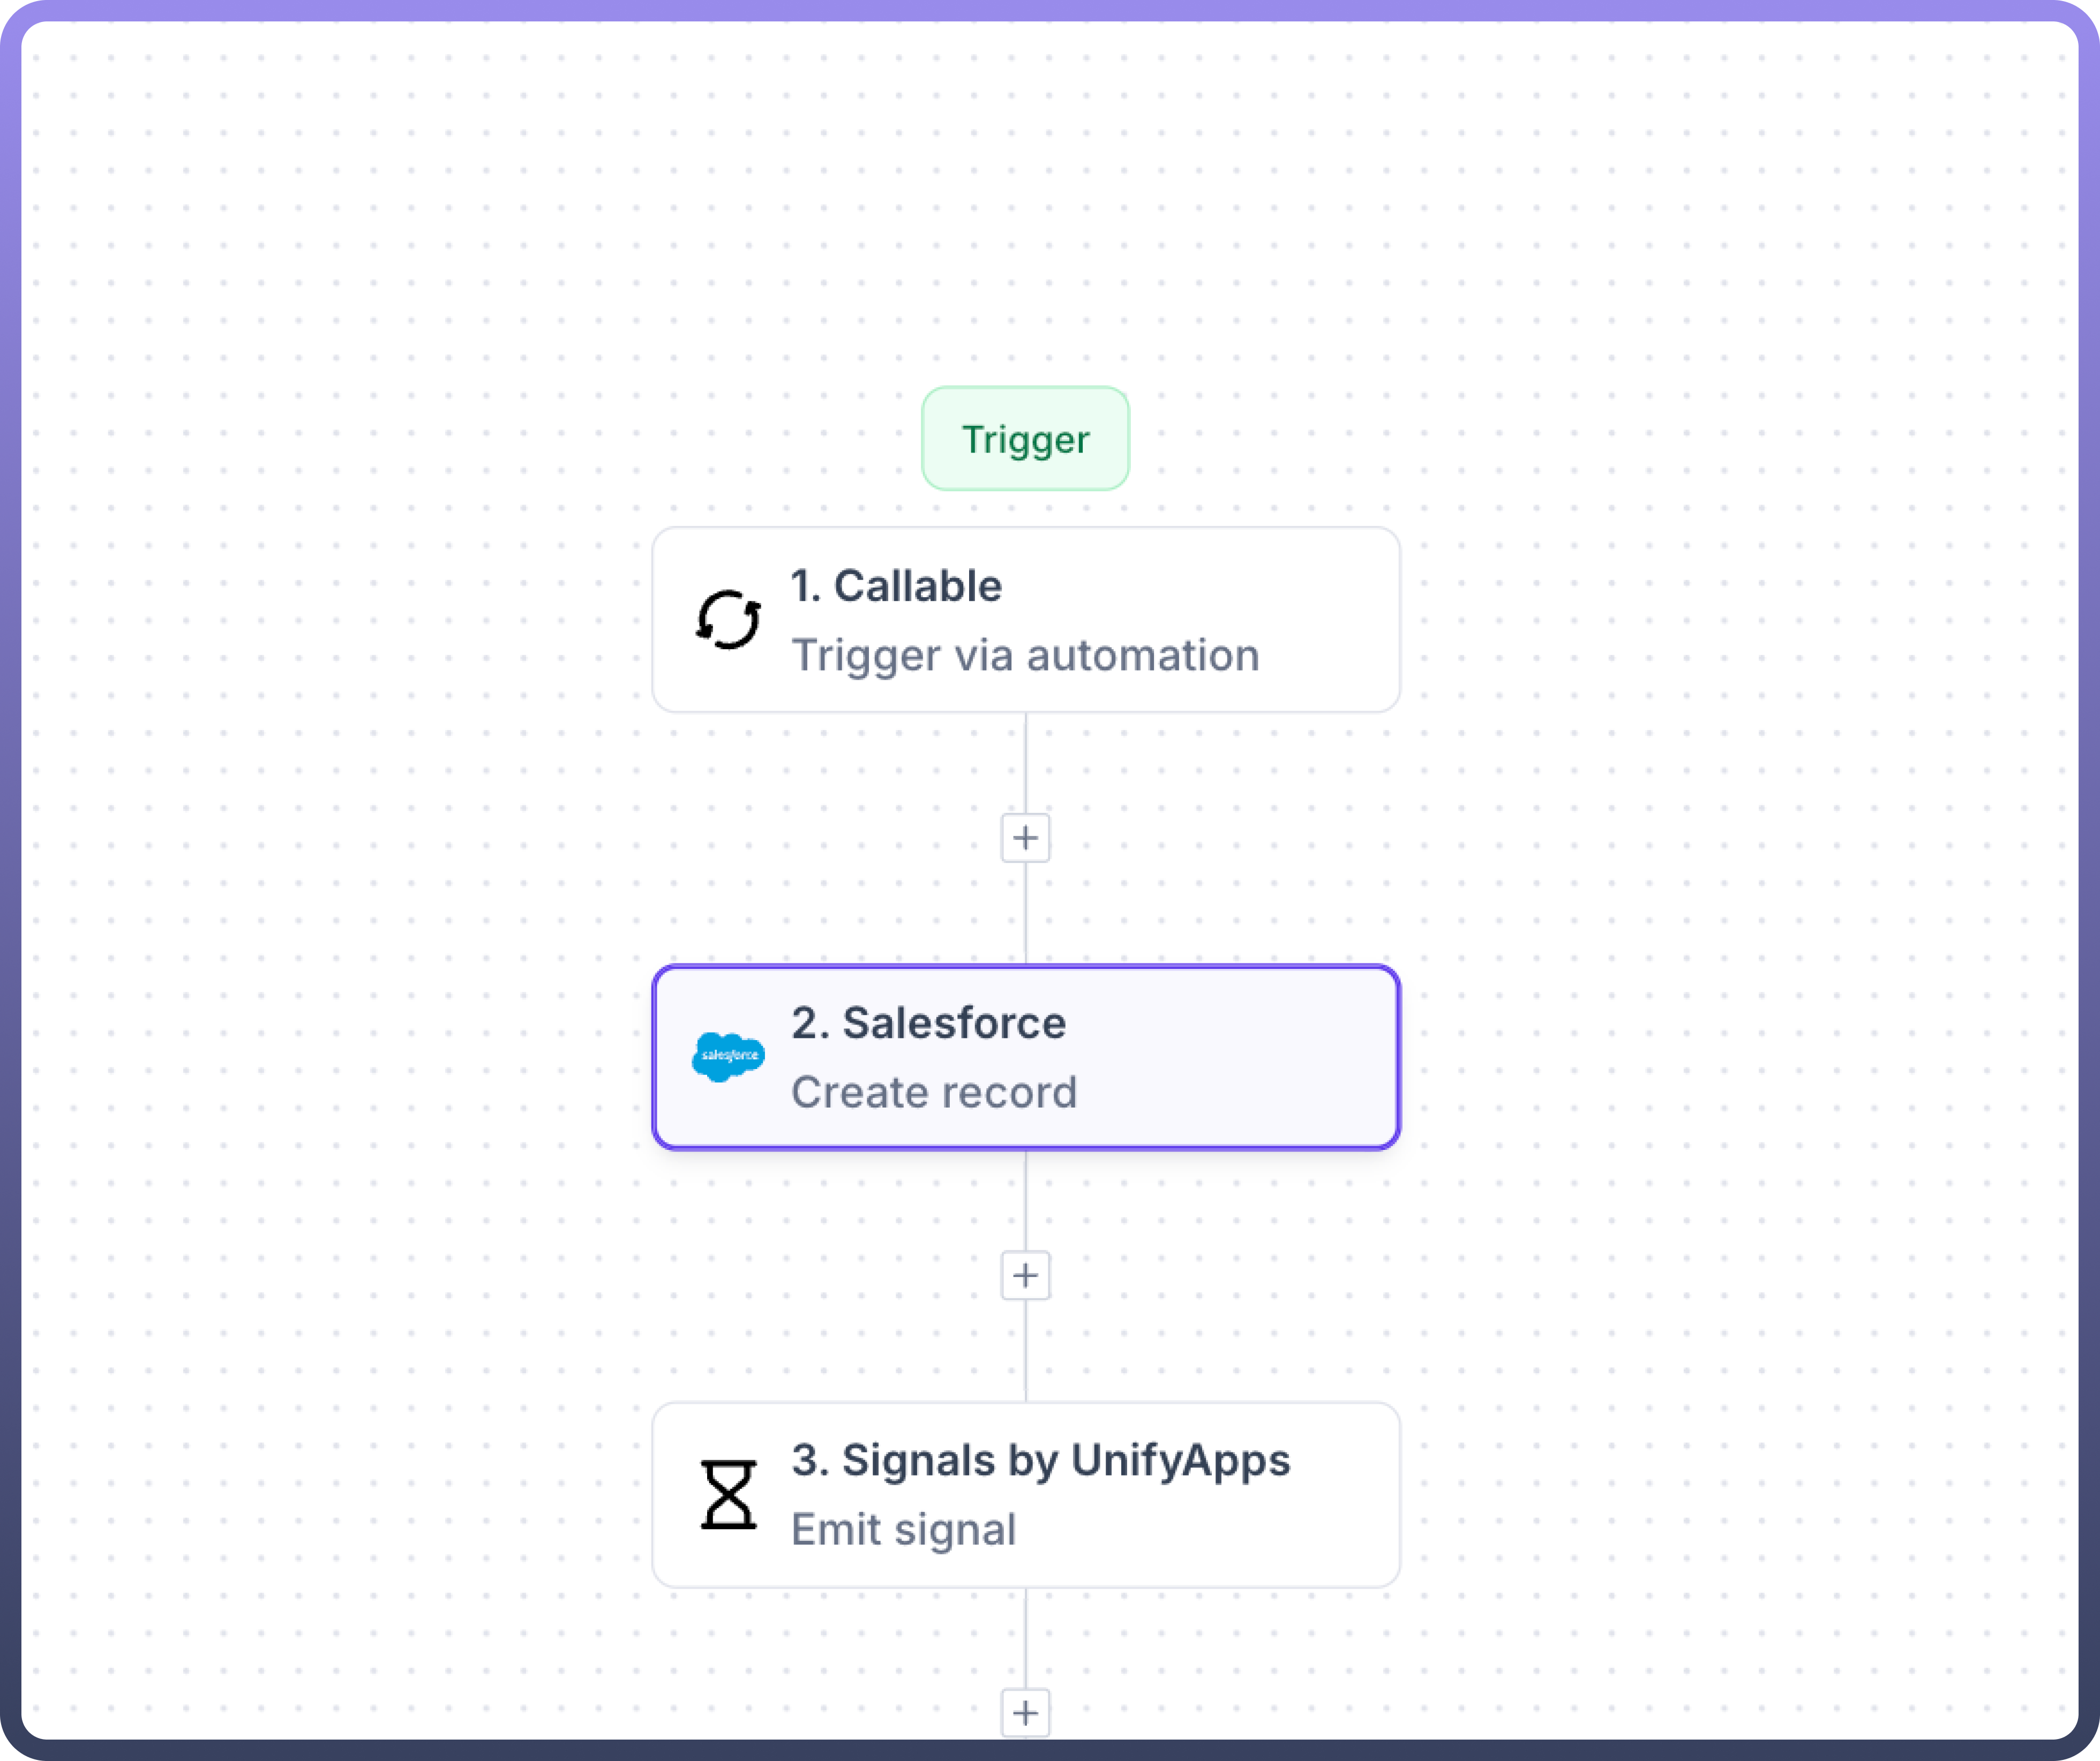
Callable These can be triggered from within another automation or via API calls, serving as a way to manually start an automation process whenever needed.
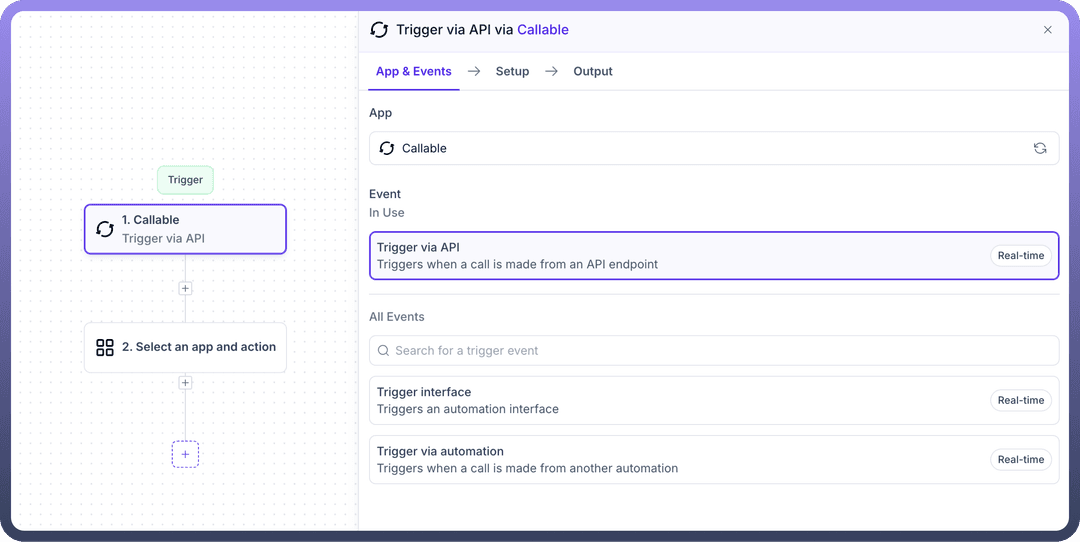
We have three actions in the callable trigger:
Trigger via API: Allows you to trigger automation through external API requestsTrigger Interface: This allows you to create standardized interfaces for your automation, enabling dynamic selection and execution of automations.Trigger via Automation: Allows you to build automations that can be called from other automations
2. Webhook
Webhooks in UnifyApps enable real-time execution of automations. The automation runs immediately upon receiving a trigger event, such as a new form submission, an update in a CRM system, or an API request to the designated webhook endpoint.
Scheduler Triggers
Schedule triggers help users run automations at predefined time intervals. Users can configure schedule triggers to recur at set intervals (hourly, daily, or monthly) and/or to activate at a specific date and time using a Cron Expression.


Example Use Case: A customer support team wants a daily summary of all Zendesk tickets, including their assignees, subjects, and statuses. This summary should be posted daily in a dedicated Slack channel to keep the team informed and aligned.
Process:
Configure a scheduler trigger to activate at 7:10 AM on a day 10 of the month and on Wednesday, only in November.
Obtain a list of all tickets from Zendesk
Post the list on the dedicated Slack channel
.png&w=1080&q=75)
.png)
Apps and Actions
Helpers
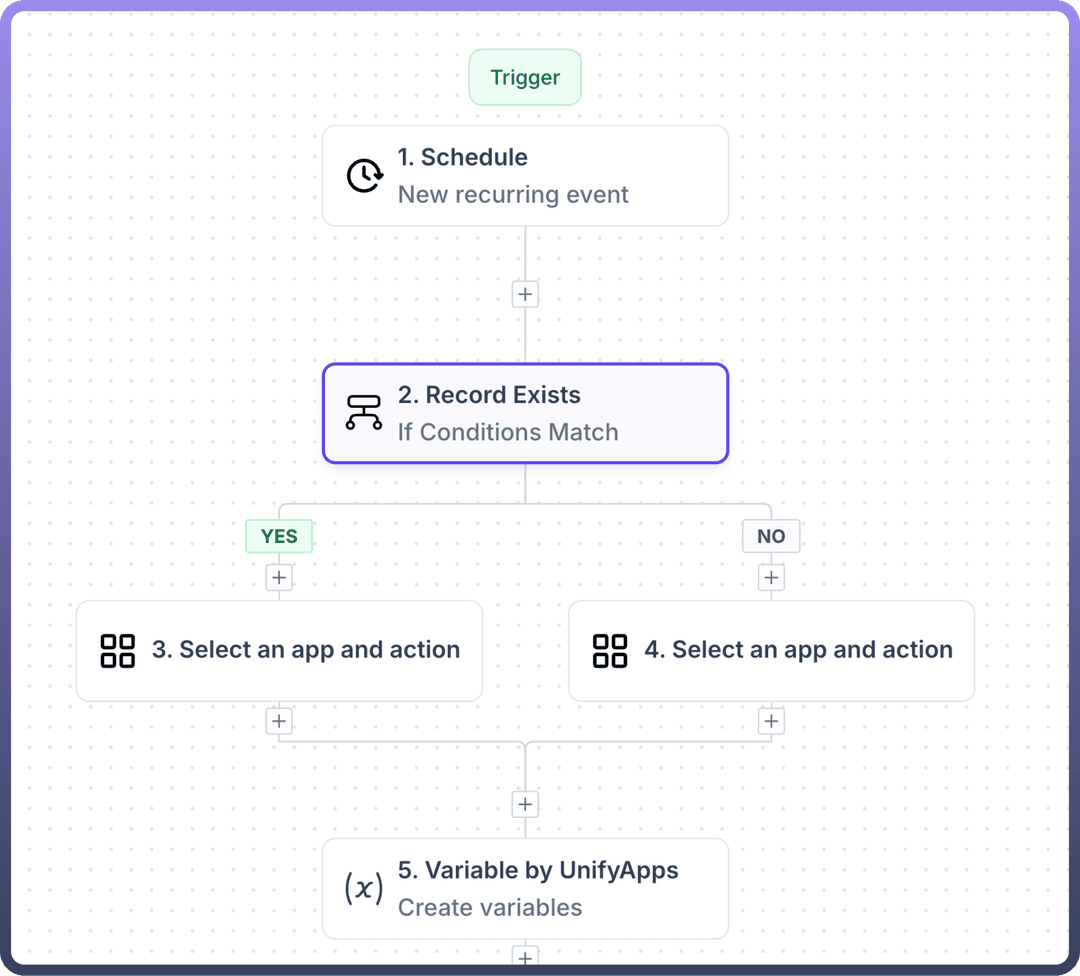
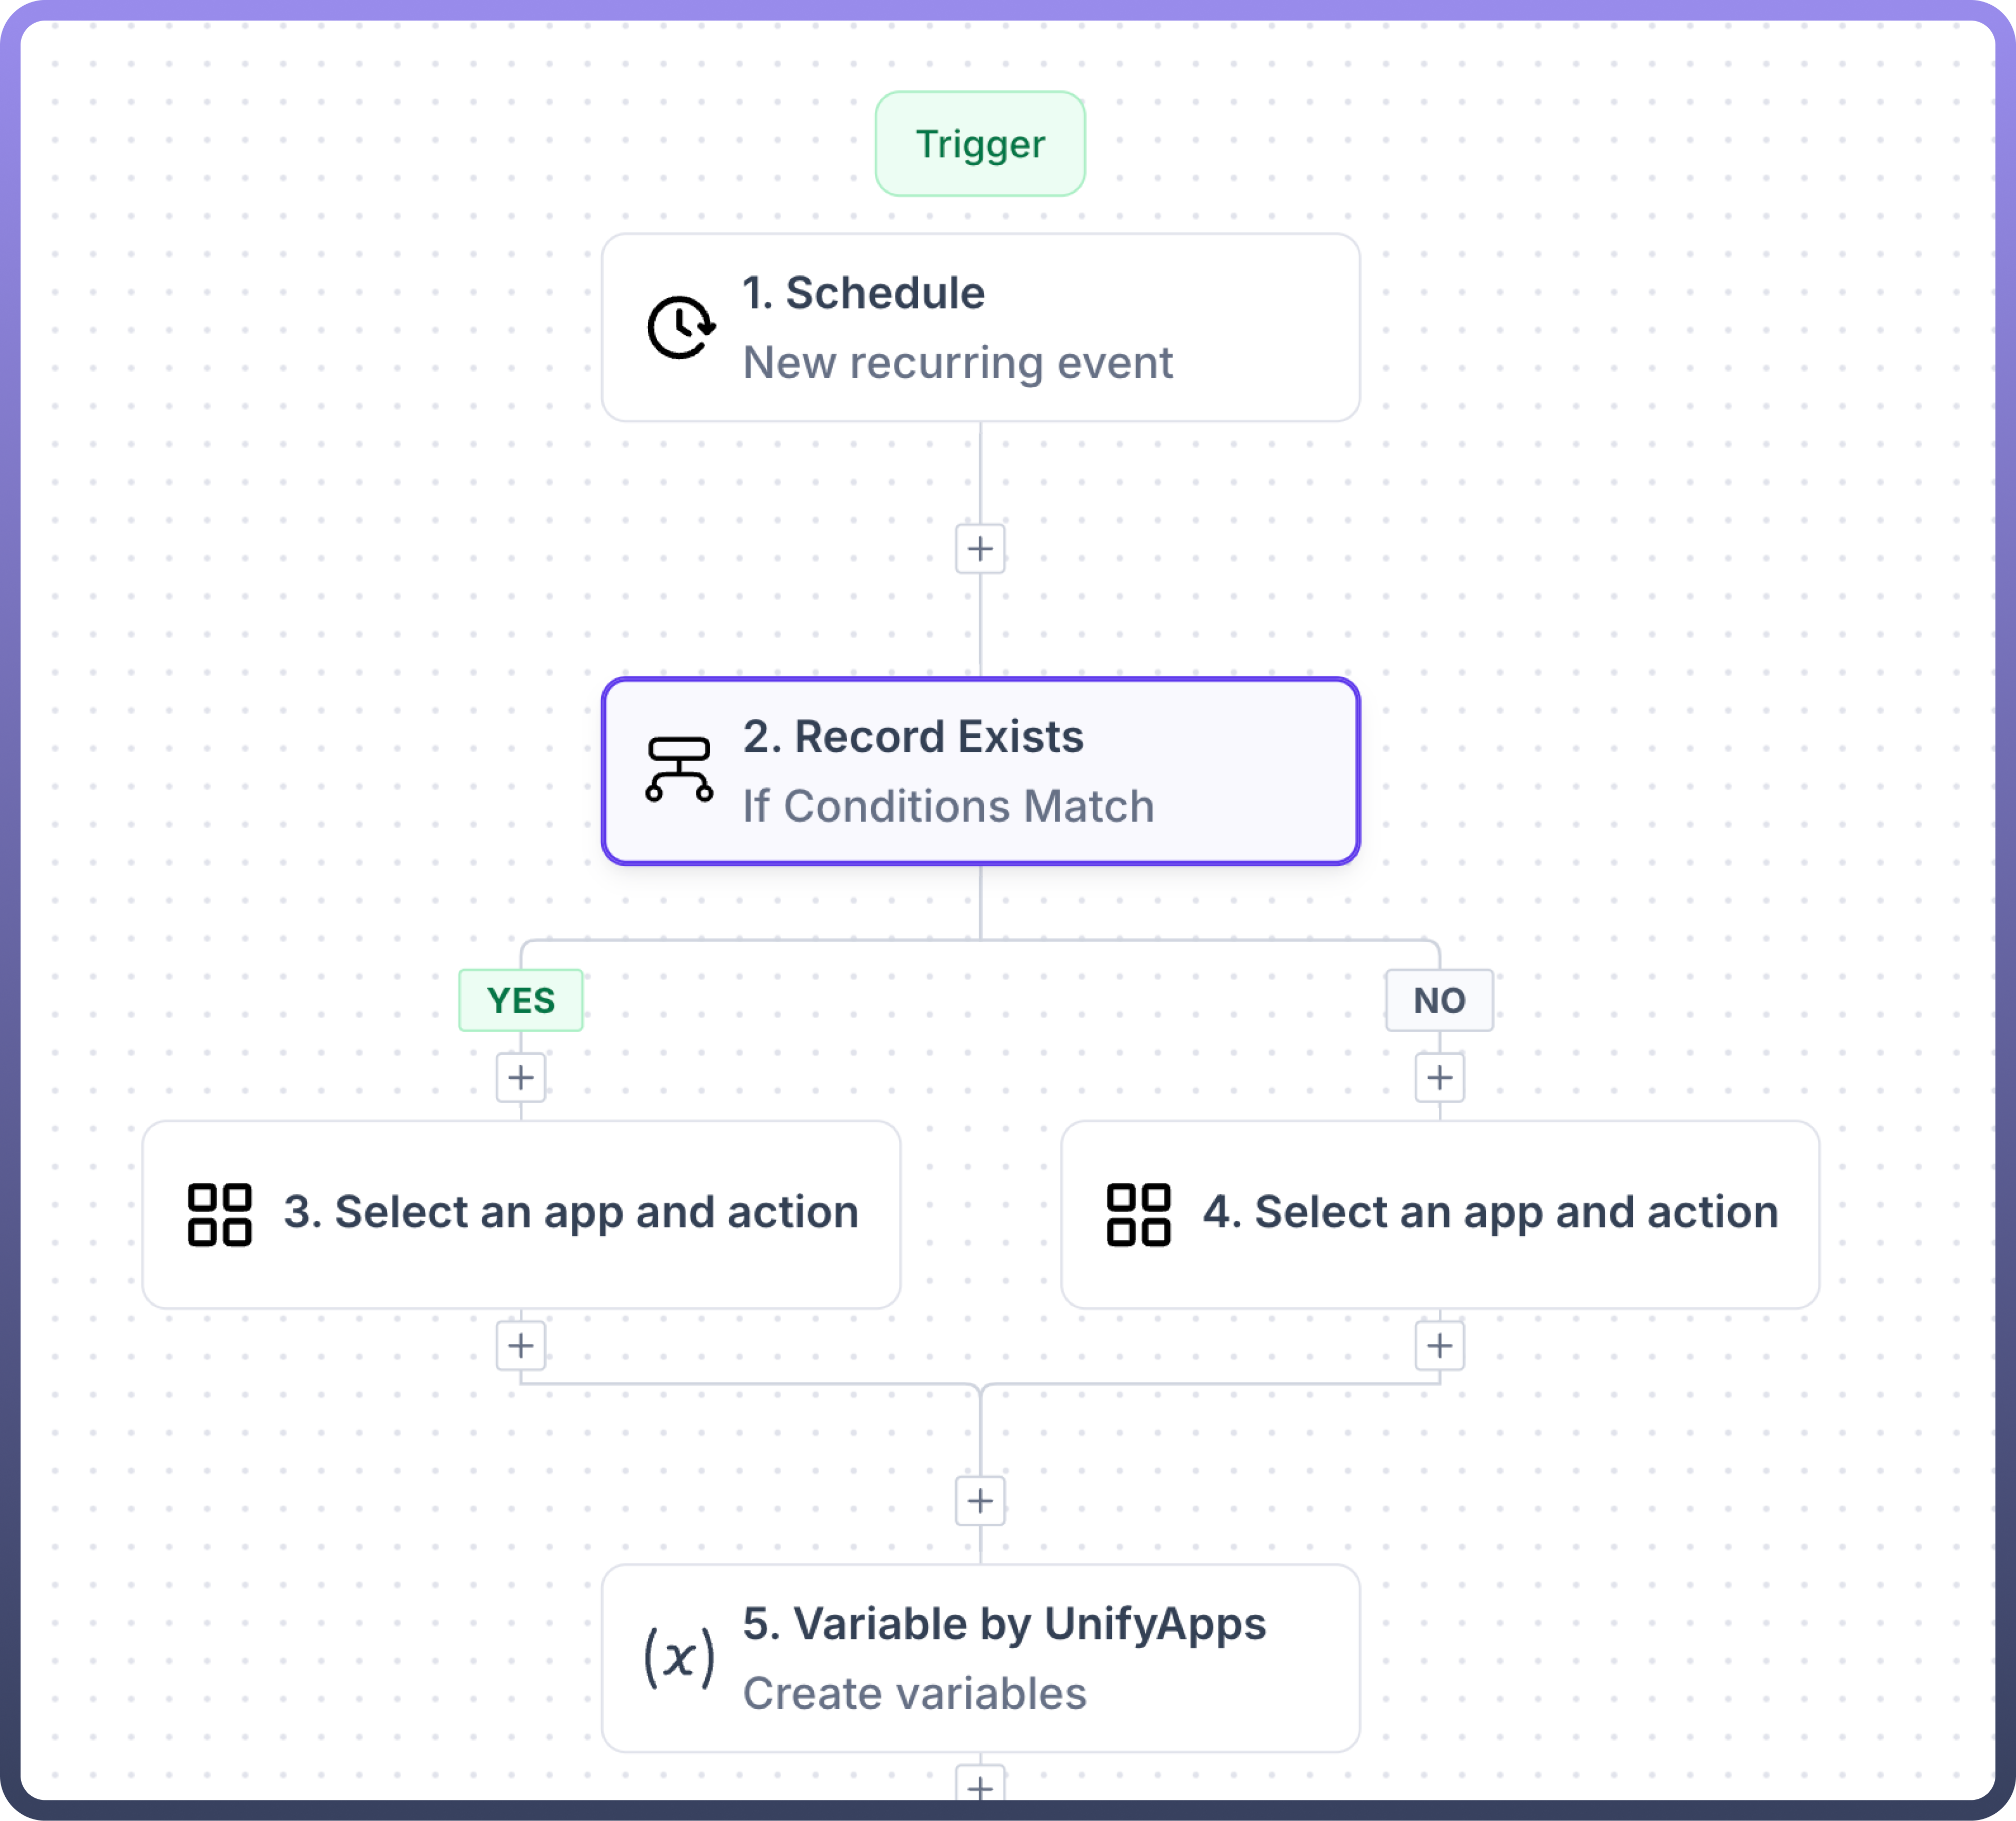
1. Condition
The condition node enables conditional logic within the automation, allowing automations to branch based on specified criteria, similar to an if-else statement in programming.
Users can define conditions that, when met, trigger actions in the "yes" branch, while alternative actions can be initiated from the "no" branch if the conditions are not met.
Grouping: Use the group button to combine multiple conditions, condition groups are useful when you want to implement a complex logic including both OR and AND .
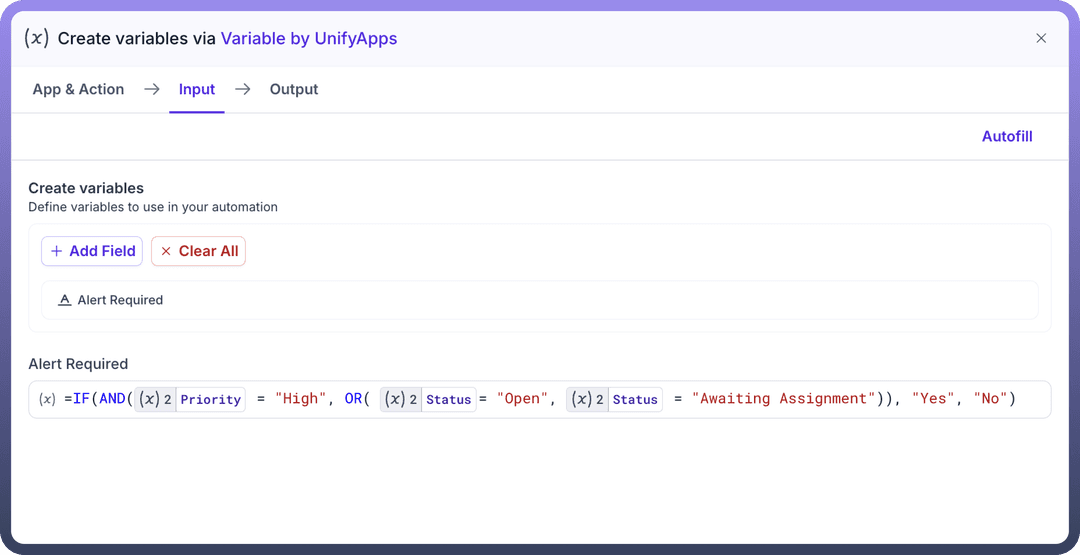
For Example , When a ticket is created in Zendesk, if the ticket priority is “High” and status of the ticket is either “Open” or “Awaiting Assignment”, then send an email to the support team.
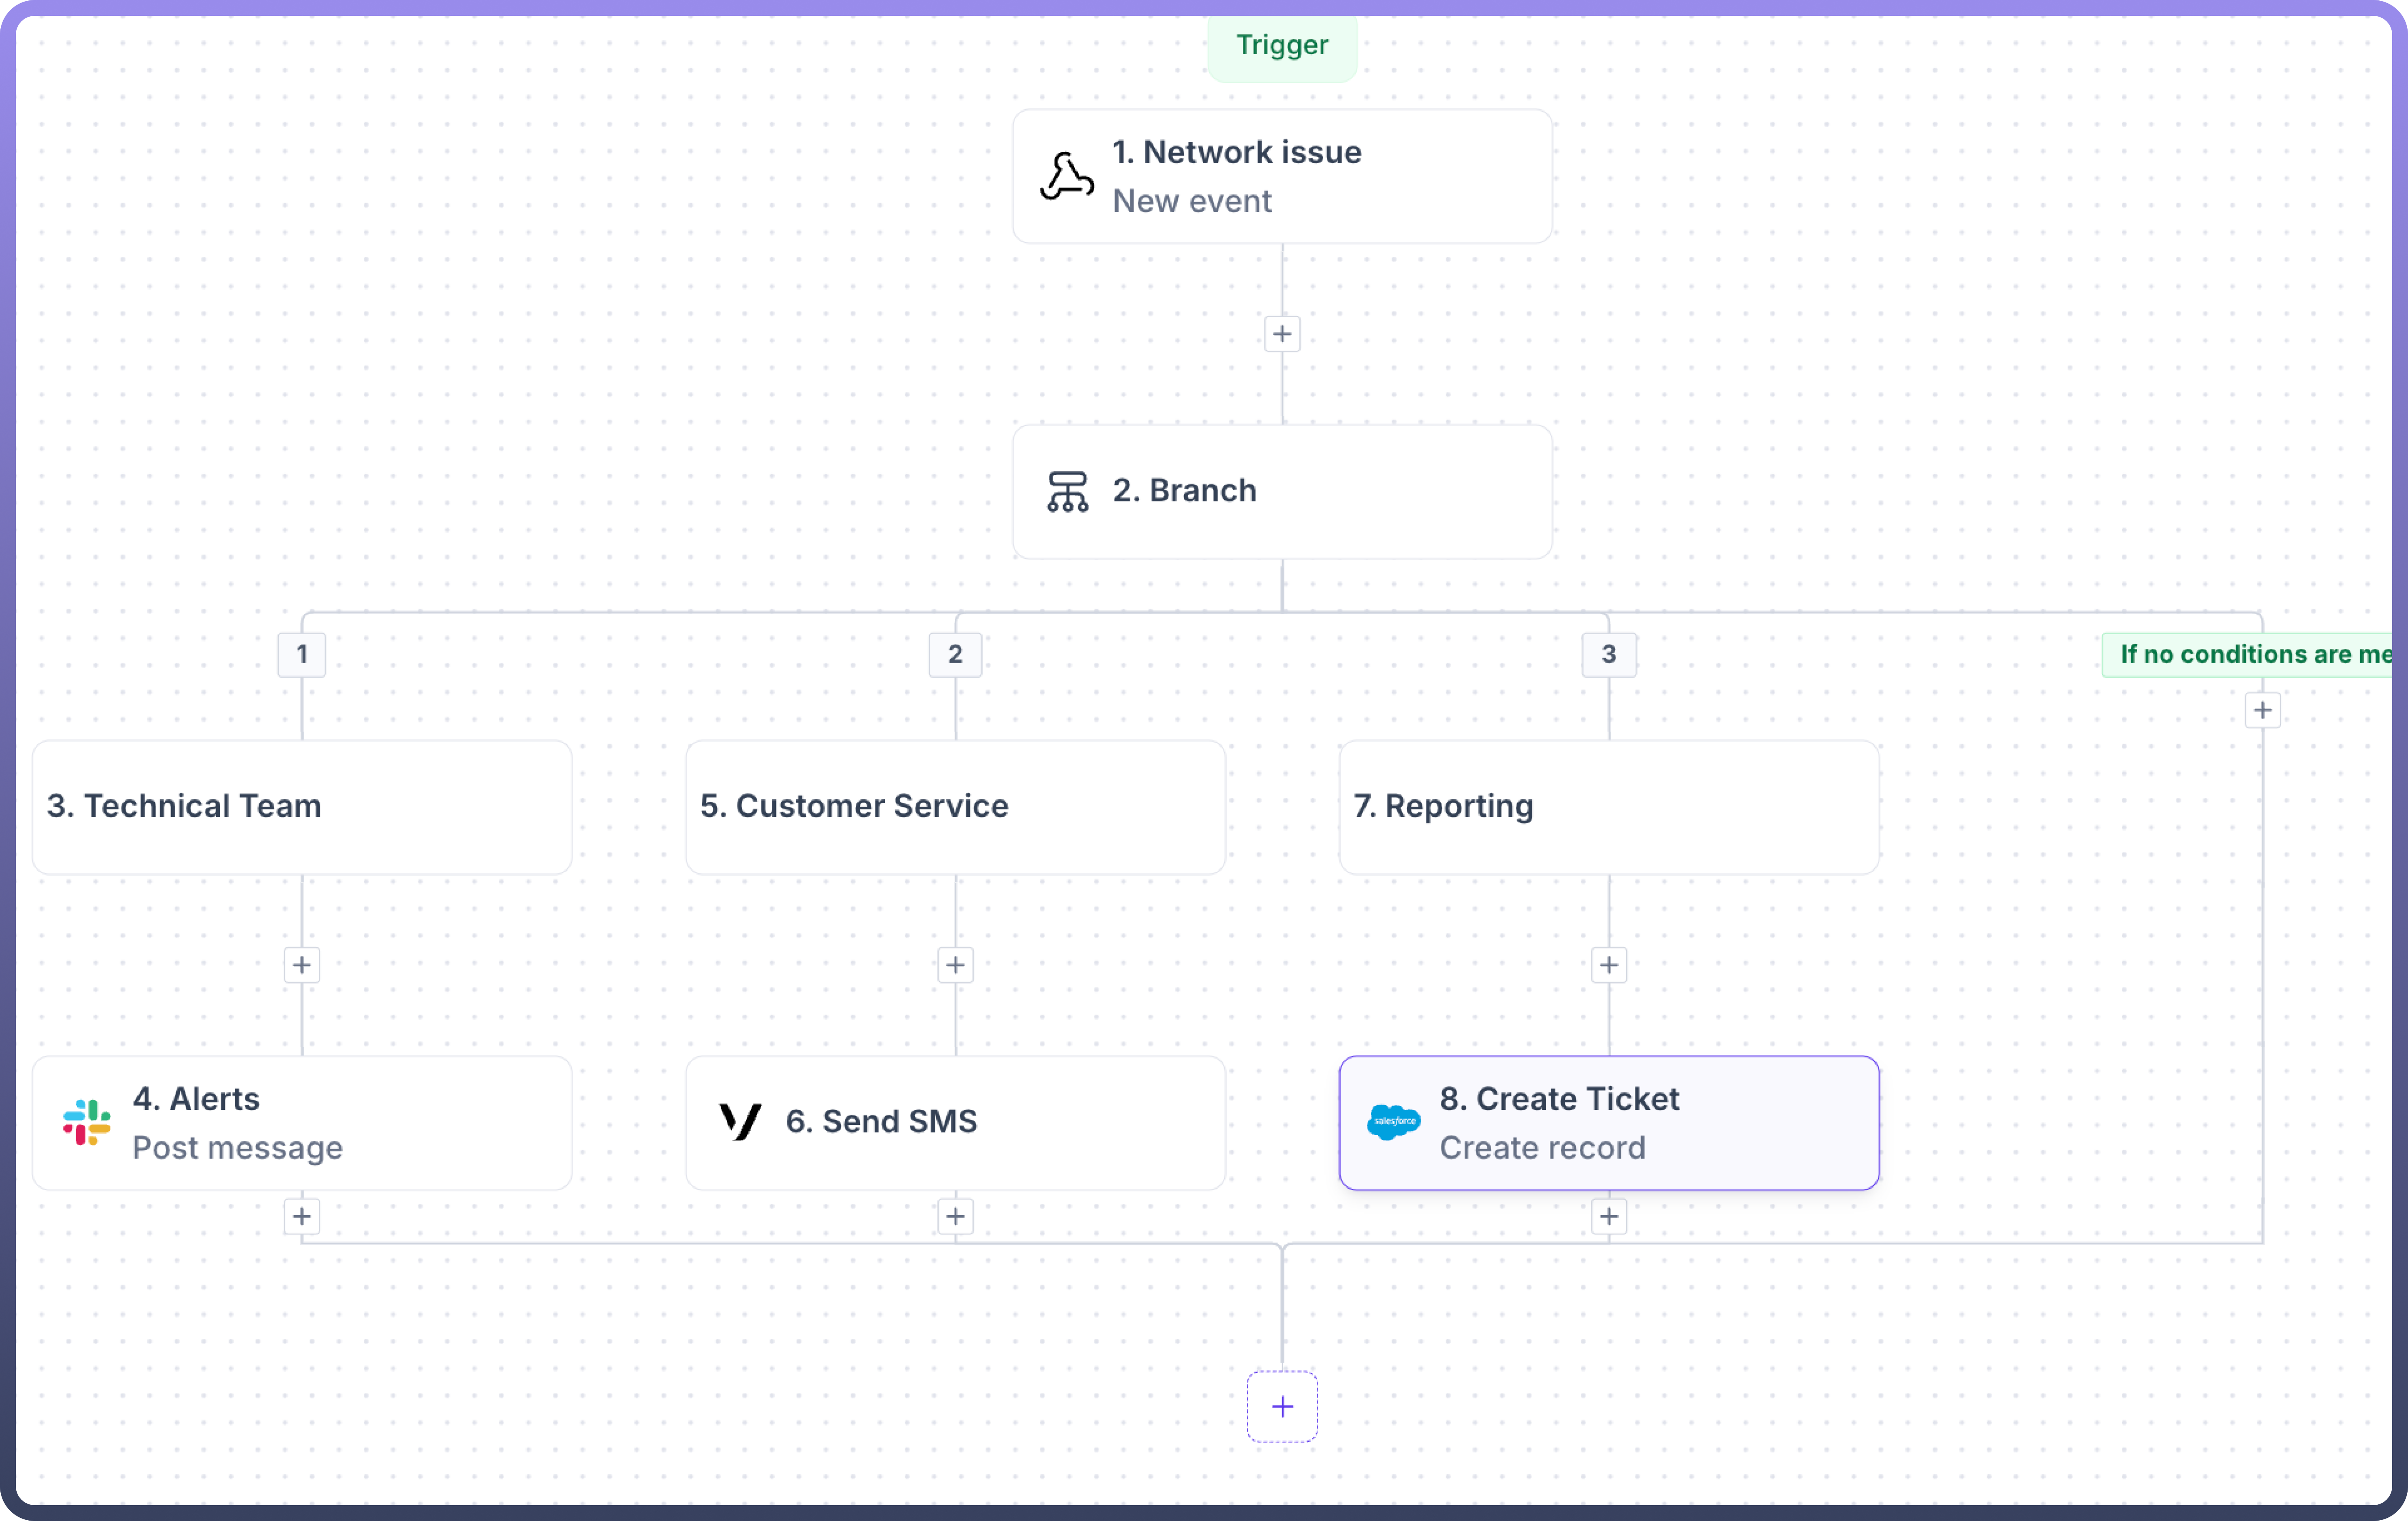
2. Branch
The branch node executes multiple action sequences simultaneously based on defined conditions within a branch. Each branch can be configured with specific conditions that determine when it activates, using conditional logic: "If A happens in your condition node, then do X. If B happens, then do Y." Let's say there's a network issue in the Munich area. Here's how branch node helps handle multiple processes at once:
When network issue occurs → Branch node splits into 3 paths:
Branch 1: Technical
System automatically alerts the field engineers
Branch 2: Customer Service
Sends SMS to all affected customers in Munich
Branch 3: Reporting
Creates an incident ticket in the system
Because of the branch node, all these actions start immediately when the issue is detected, rather than waiting for each task to finish. This means faster response time and better customer service.

Note
You can use branches with or without conditions. In this example, all branches run automatically when a network issue is detected.
The branch node offers two key functionalities:
Managing complex automations by combining multiple conditions at a single node
Running multiple flows in parallel when either conditions are empty, set to universal true, or when multiple conditions match simultaneously, enabling concurrent execution of different workflow paths.
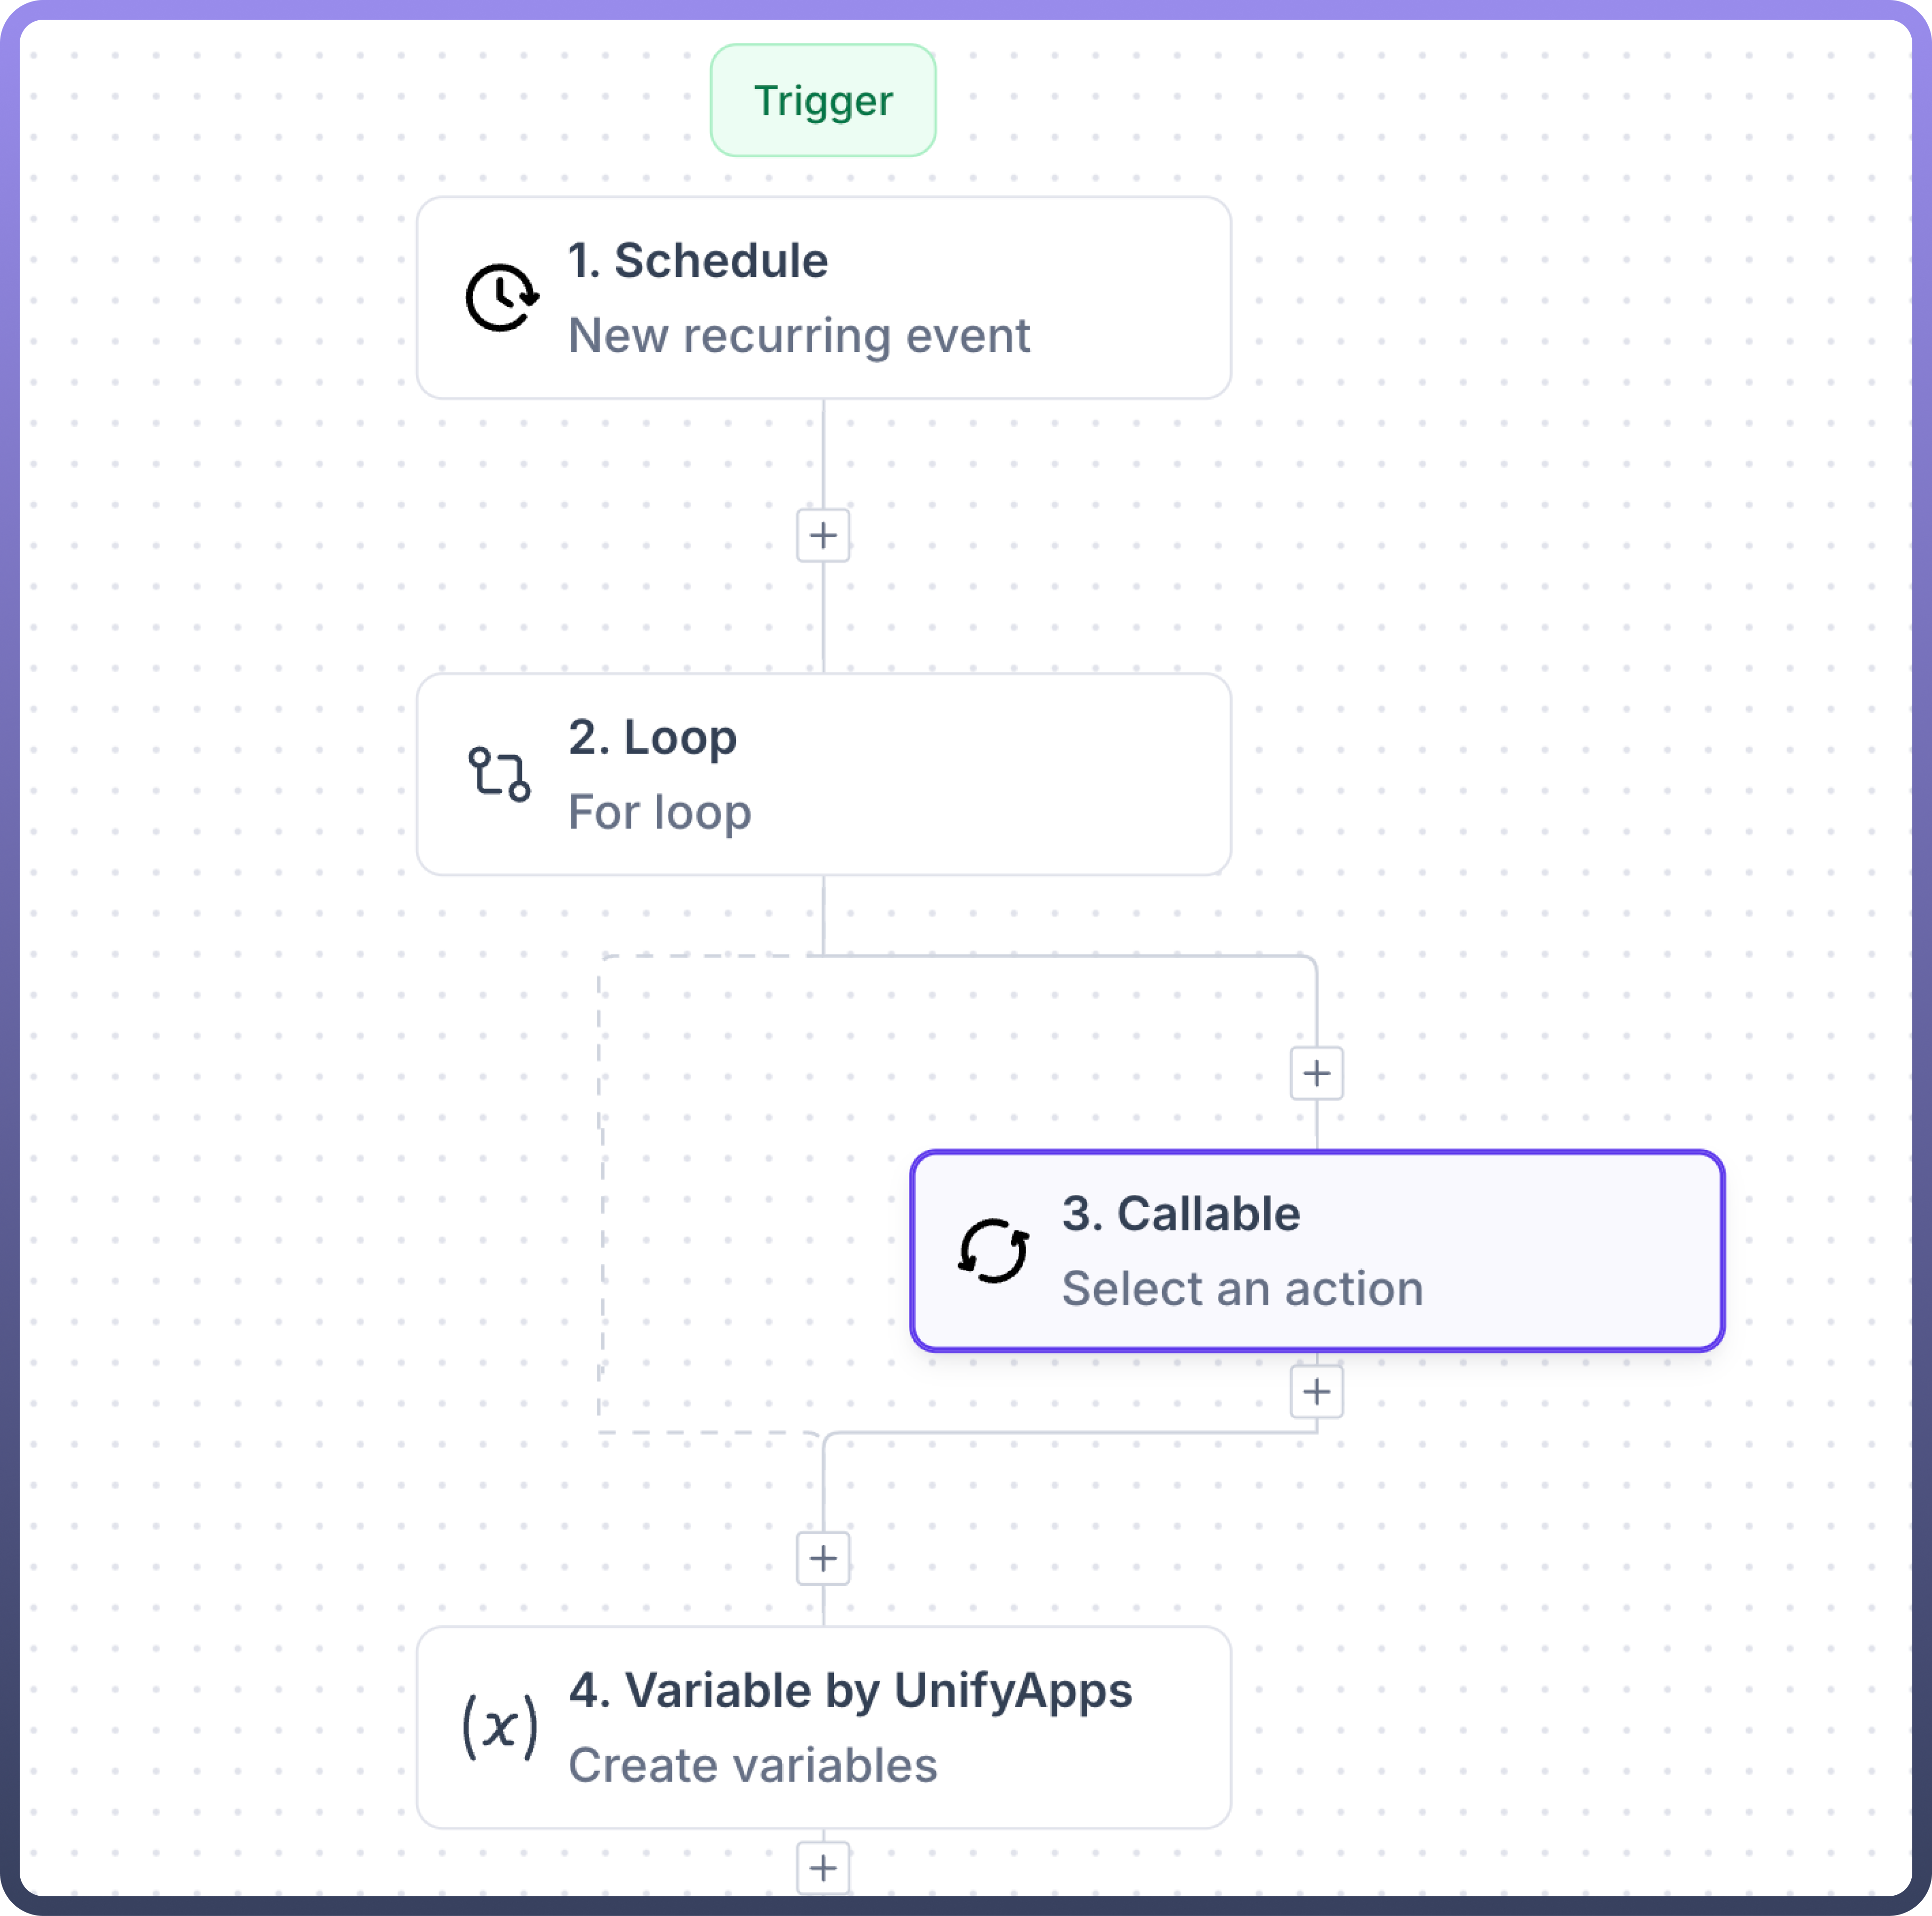
3. Loop
Loop allows you to repeat a set of steps based on different criteria.
Types of Loops:
While Loop: This loop repeats the set of actions as long as a specified condition remains true. Once the condition becomes false, the loop terminates automatically.For Loop: A for loop iterates over a list and executes a set of actions for each element within that list. The loop concludes once all elements have been processed.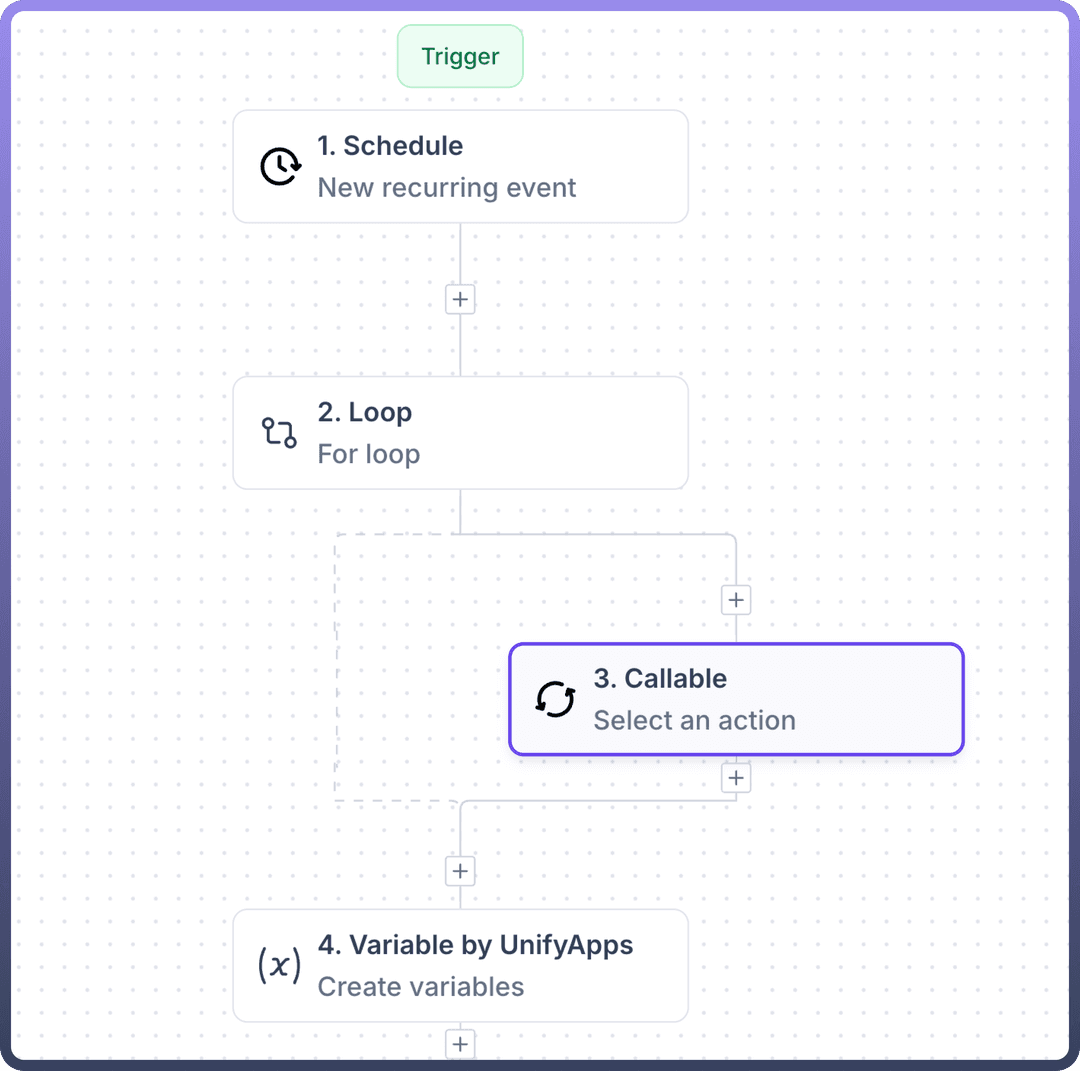
Avoid Infinite Loop
An infinite loop happens when an automation accidentally keeps repeating itself without end. This can happen in two ways:
When one automation triggers another automation in an endless cycle
When an automation triggers itself repeatedly
These loops result in unnecessary jobs, excessive API calls, and can consume all system resources, slowing everything down.
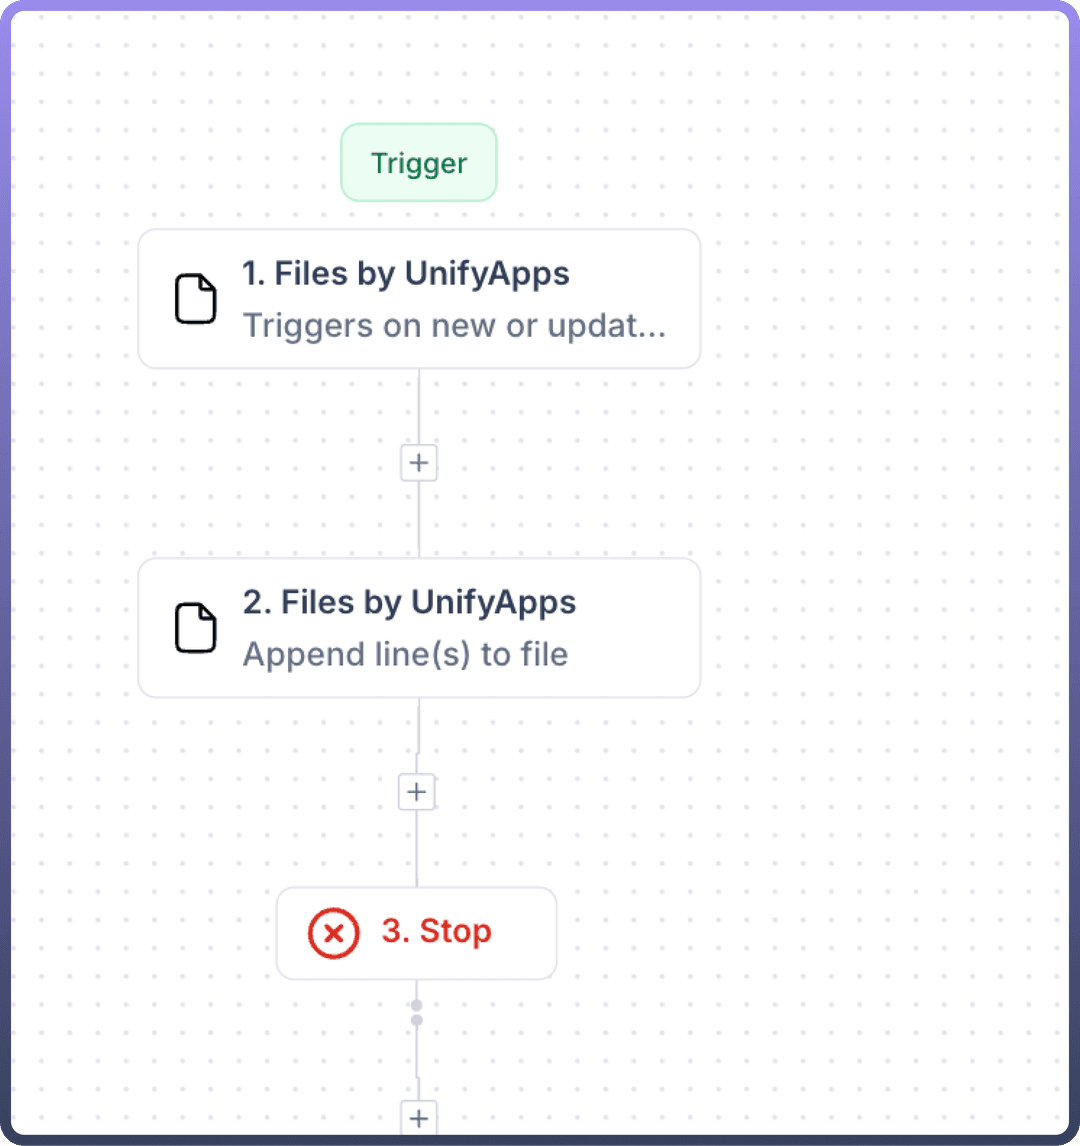
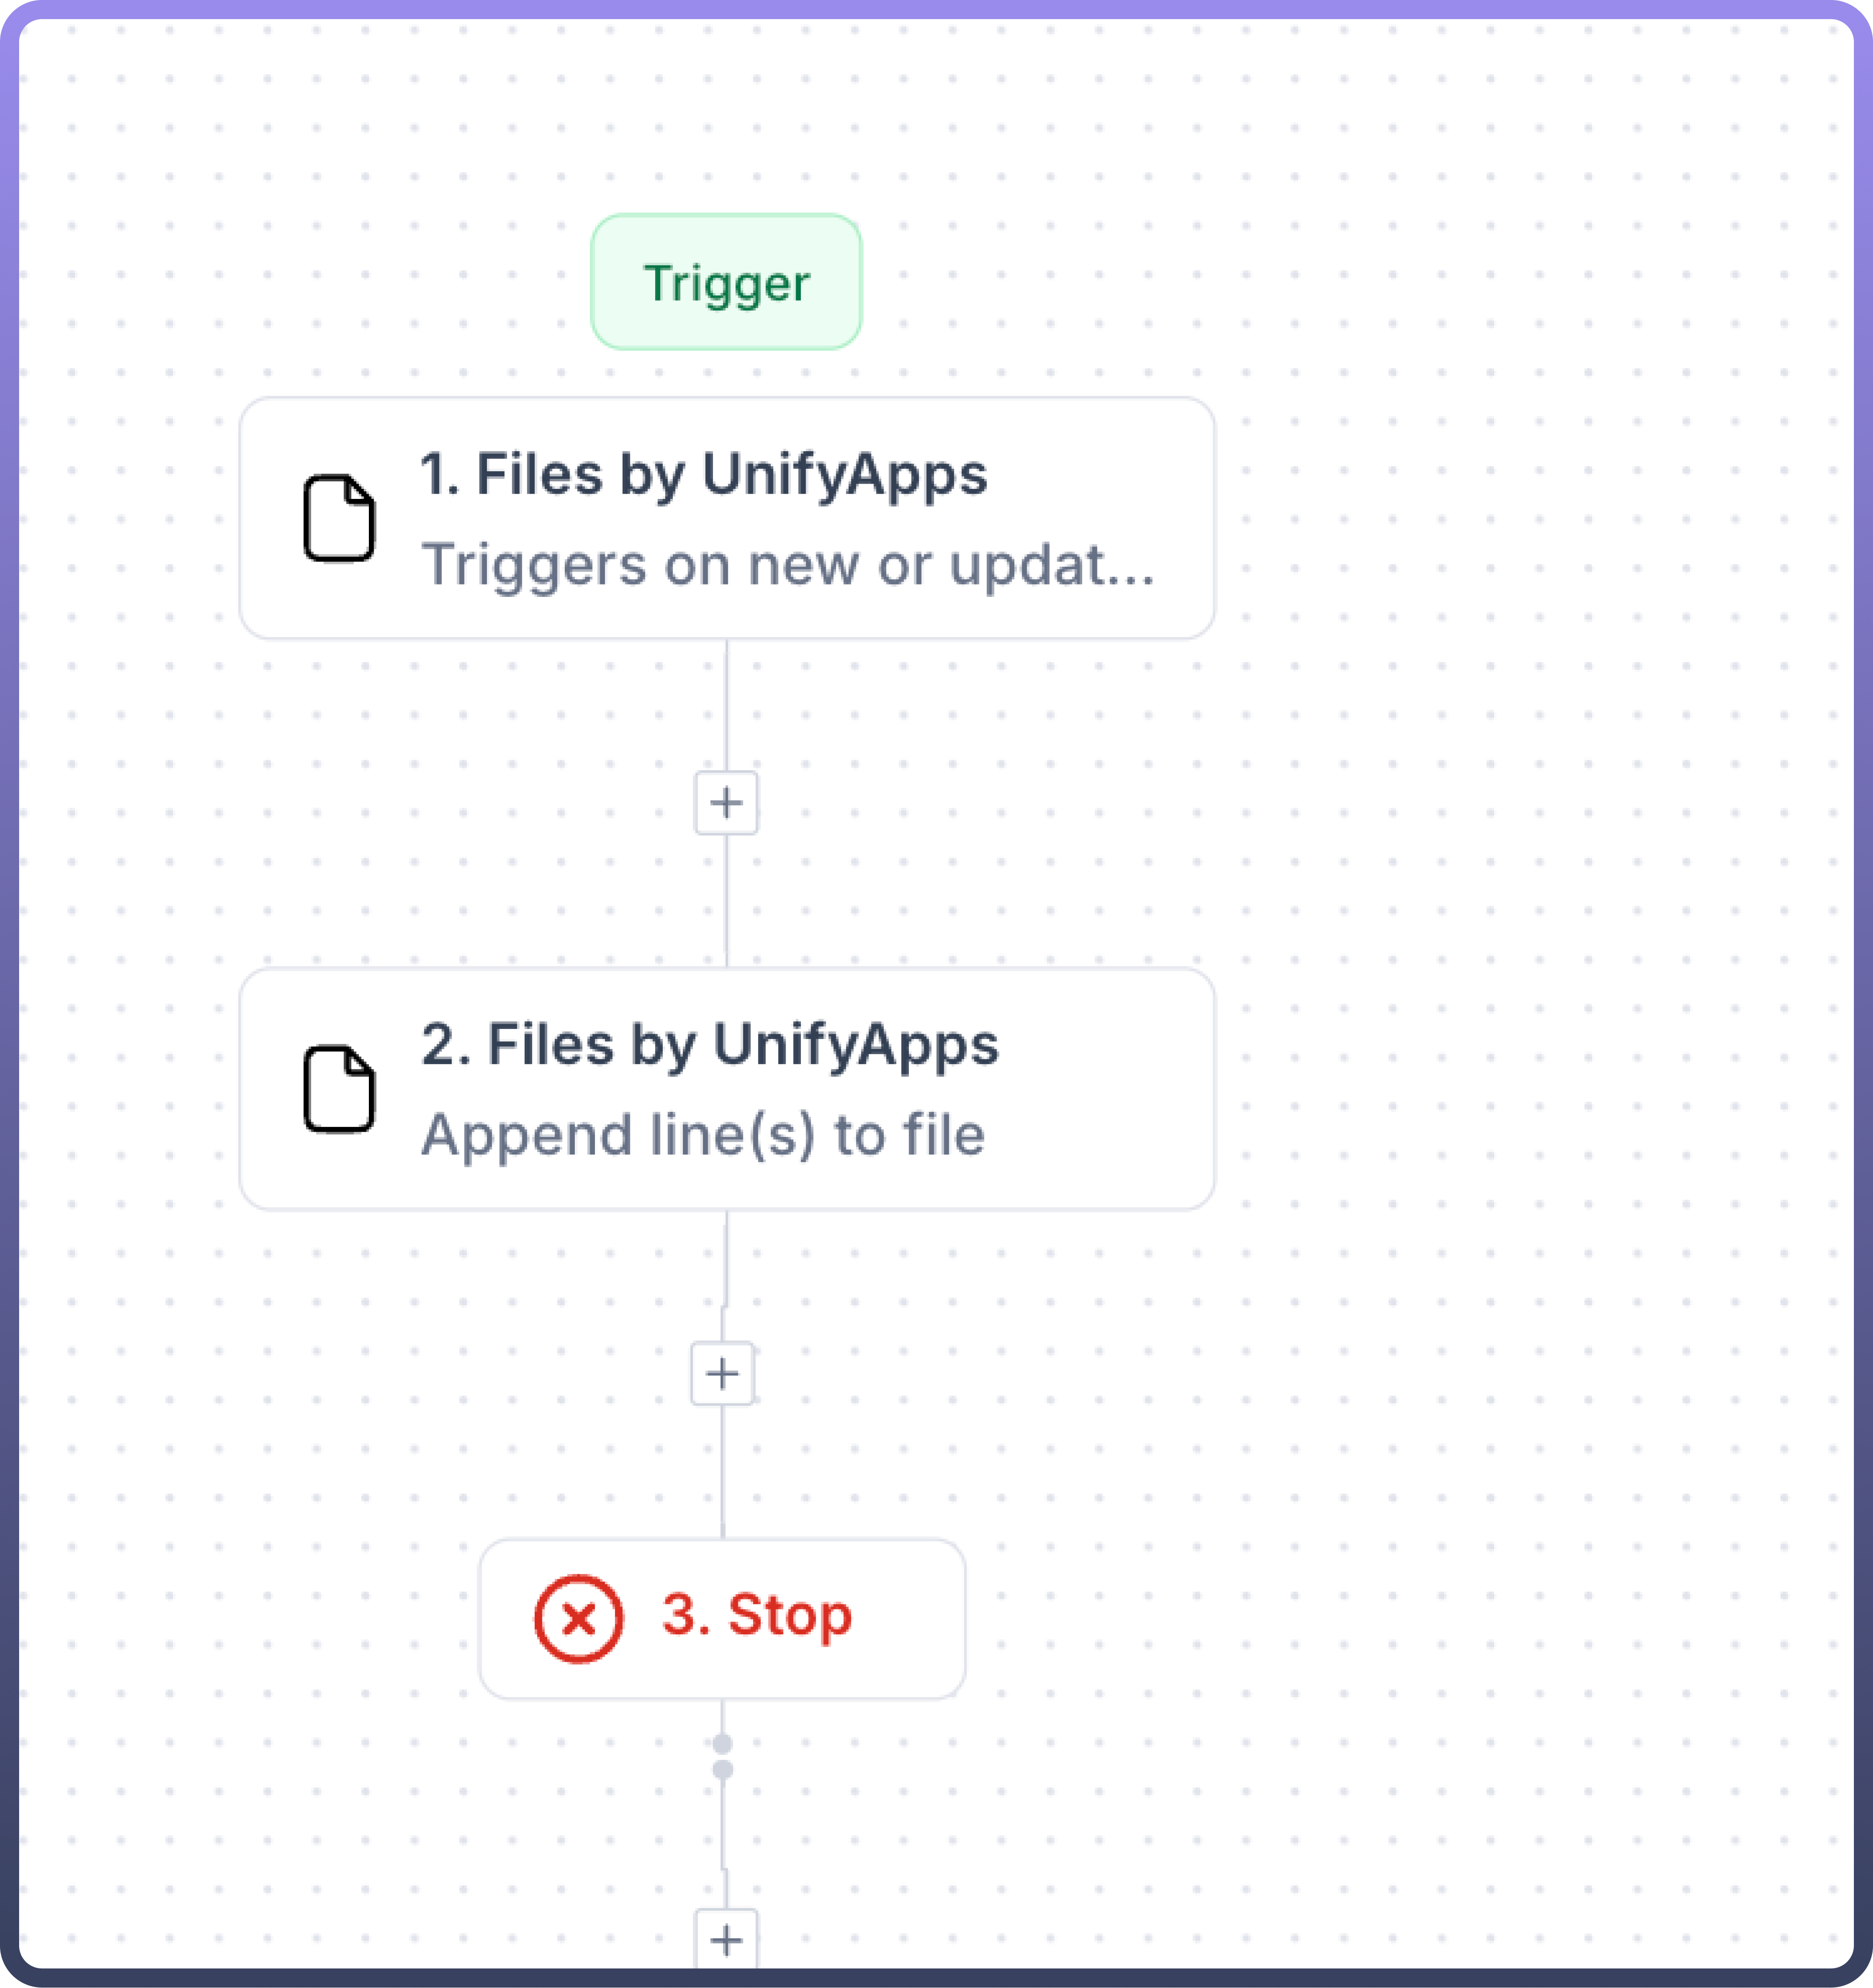
Example: Imagine an automation that triggers whenever a file is created or updated. In this workflow, at the end of the process, a new line is appended to the same file. Since the automation is triggered by that file update, the action of appending a line causes the file to be updated again, which triggers the automation once more. This cycle repeats endlessly, creating an infinite loop where the automation continuously runs without stopping.
Note
Loops have a maximum execution limit of 50,000 iterations to prevent infinite loops. The automation will automatically break and exit if this limit is reached.
4. Formulae
Formulae by UnifyApps are expressions used to perform calculations, manipulate data, and automate tasks. They enable users to process numerical data, text, dates, and logical conditions to derive results efficiently.
Why Do We Need Formulae?
Automation: Repeated manual calculations are tedious and error-prone. Formulas help automate these tasks, ensuring accuracy and consistency.
Data Analysis: Formulas allow users to analyze large datasets by calculating averages, sums, percentages, and more to derive insights.
Efficiency: Formulas offer speed for complex calculations, accuracy by reducing human error, scalability to handle large datasets, and flexibility with various mathematical, statistical, and logical functions.
Logical Operations: Formulas allow for conditional evaluations, such as checking if values meet certain criteria (
IF(),AND(),OR()).Streamlined Workflows: By using formulas, we can reduce the number of steps in an automation, making it easier to maintain and troubleshoot. For example, instead of using multiple condition nodes, a single formula can handle complex logic.
A formula can be invoked by using an equals sign (=) and may contain:
Operators like
+,-,*,/for mathematical operationsNode field references to work with values from specific automation nodes
Functions like
SUM(),LEN(),NOW()to perform predefined calculations
Examples:
NOW(): Retrieves the current date and time to identify tickets created in the last hourINT(): Converts numeric values into integers as ticket ID is stored in string format in objectLEN(): Checks the length of comments to verify if any comment is posted on ticketCONCAT(): Combines different text elements, such as ticket details, to form the message for Slack
Nested Formula example: Let's say we want to handle high-priority support tickets:
“Formula” → =IF(AND(PRIORITY = "High", OR(STATUS = "Open", STATUS = "Awaiting Assignment")), "Yes", "No")
The above formula is used to set variable 'ALERT_REQUIRED':
When conditions are met (High priority AND status is Open/Awaiting Assignment) → ALERT_REQUIRED = "Yes" When conditions are not met → ALERT_REQUIRED = "No"
5. Callable
Callable automations in UnifyApps enhance process efficiency by allowing child automations to be integrated into parent workflows, similar to reusable functions in software development.
Key Benefits
Centralized Logic: Callable automations can be reused across multiple workflows
Efficient Updates: Updating a single callable automation ensures all dependent workflows automatically reflect the changes
Improved Workflow Readability: Centralizing common processes reduces complexity, making workflows easier to manage and understand
Lower Maintenance Costs: Reuse reduces duplication, minimizing maintenance effort and costs
Execution Modes
Synchronous Execution
The parent automation waits for the callable automation to complete before proceeding to the next step
Ensures that subsequent steps in the parent automation rely on the callable automation's results
Asynchronous Execution
The callable automation is triggered, and the parent automation continues without waiting for the callable process to finish
Useful when the callable automation's results are not immediately needed
Advanced Use Case: Asynchronous Calls with Signal Coordination For complex scenarios, such as running callable automations asynchronously within a loop, UnifyApps offers Signal Nodes to manage dependencies.
Scenario: You need to call the same callable automation multiple times asynchronously within a loop and wait for all instances to complete before proceeding. Additionally, you want to capture and utilize the responses from each callable automation.
Solution:
Emit Signal Node: Each callable automation instance emits a unique signal with its response
Wait Signal Node: The parent automation uses a Wait Signal Node to pause execution until all expected signals (and corresponding responses) are received
Flow:
Callable automation emits n signals, each paired with its response
Parent automation waits for n signals
Once all signals and responses are received, the parent automation processes the collected data and proceeds to the next step Parent Automation
 Child Automation
Applications
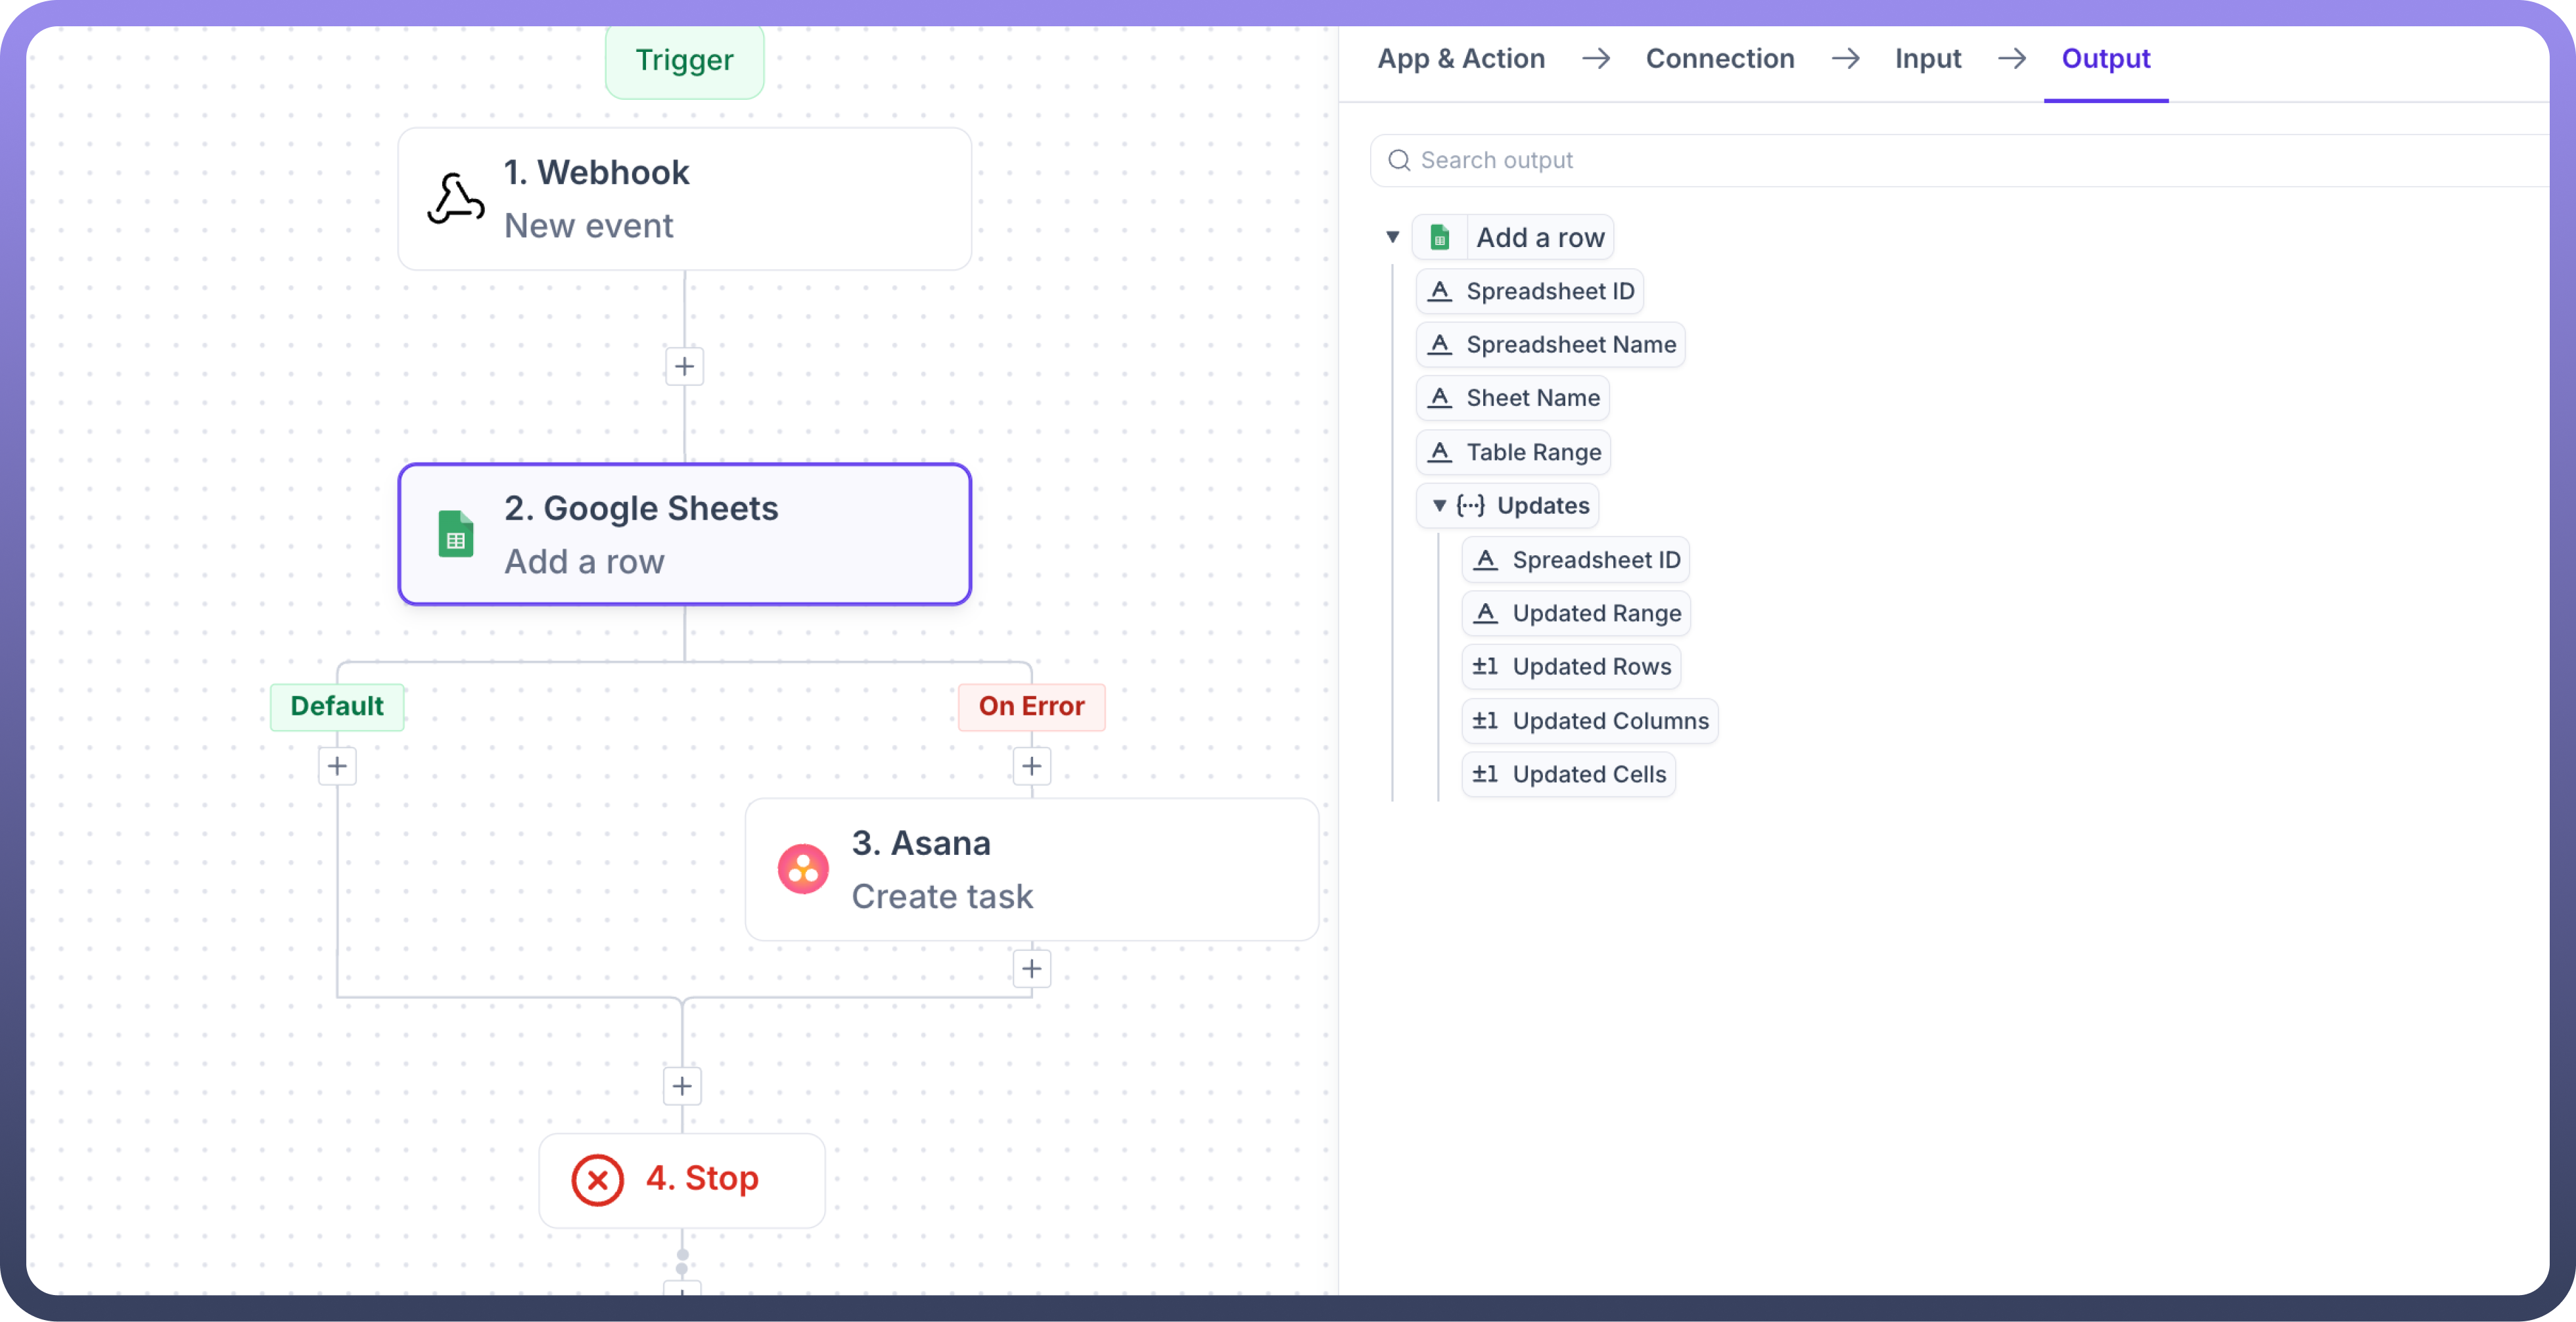
1. Select an App and Action
In UnifyApps, App & Action allows you to connect to various applications and perform specific actions within your workflows. This feature streamlines the process of integrating with external services, updating records, or sending notifications by providing pre-configured connectors for numerous applications.
Choose an App:
Navigate to the App & Action tab and use the search bar
For example, select Google Sheets to automate spreadsheet operations
Select an Action:
After selecting the app, choose an action from the dropdown
Example: Create Spreadsheet Row for Google Sheets
Actions define what the app will do, such as fetching data, creating records, or updating information
2. Select an Available Connection
Connections Module:
Connections are created and managed in a separate Connections module
This allows you to centralize and reuse your app connections across multiple workflows
Select a Connection:
Once you have created a connection in the Connections module, it will appear in the connection dropdown within the App & Action step
Choose an available connection for the selected app
Example: For Google Sheets, select the connection associated with your Google account
3. Input Parameters
Configure the inputs required for your action:
Use Map from Step to dynamically pull data from previous steps in your workflow
Alternatively, manually enter values or reference custom data pills
Example: If you're adding a row in Google Sheets, input fields like Spreadsheet Name and sheet name will be displayed

Advanced Configuration Options:
Caching
Default: Disabled
Purpose: Improve performance by caching data for repeated operations
Retry on Error
Purpose: Automatically retries the step if an error occurs
Ideal for handling transient issues like network disruptions
Error Handling Options
Stop Automation: Halts the entire automation if an error occurs
Continue Automation: Skips the error and proceeds to the next step
Follow Error Path: Redirects to a predefined error-handling path
Rate Limit Policy
Purpose: Sets throttle limit to avoid exceeding API rate limits
Circuit Breaker
Purpose: Temporarily halts requests to an unresponsive API
Enable Telemetry
Purpose: Collects performance metrics and error data
Exclude Input and Output in Runs
Purpose: Hides input and output data from logs
Business Hours
Purpose: Ensures execution only during defined business hours
Logging
Purpose: Enables custom log messages for tracking and debugging
Hooks
Pre-Hooks: Execute actions prior to the main step
Post-Hooks: Execute actions after the main step
.png&w=1080&q=75)
.png)
4. Output Schema
UnifyApps automatically exposes the output schema for the selected action
Use output data pills in downstream steps by mapping them to required fields
Example: For Create Spreadsheet Row, the output might include fields such as Spreadsheet Name, and Time Range
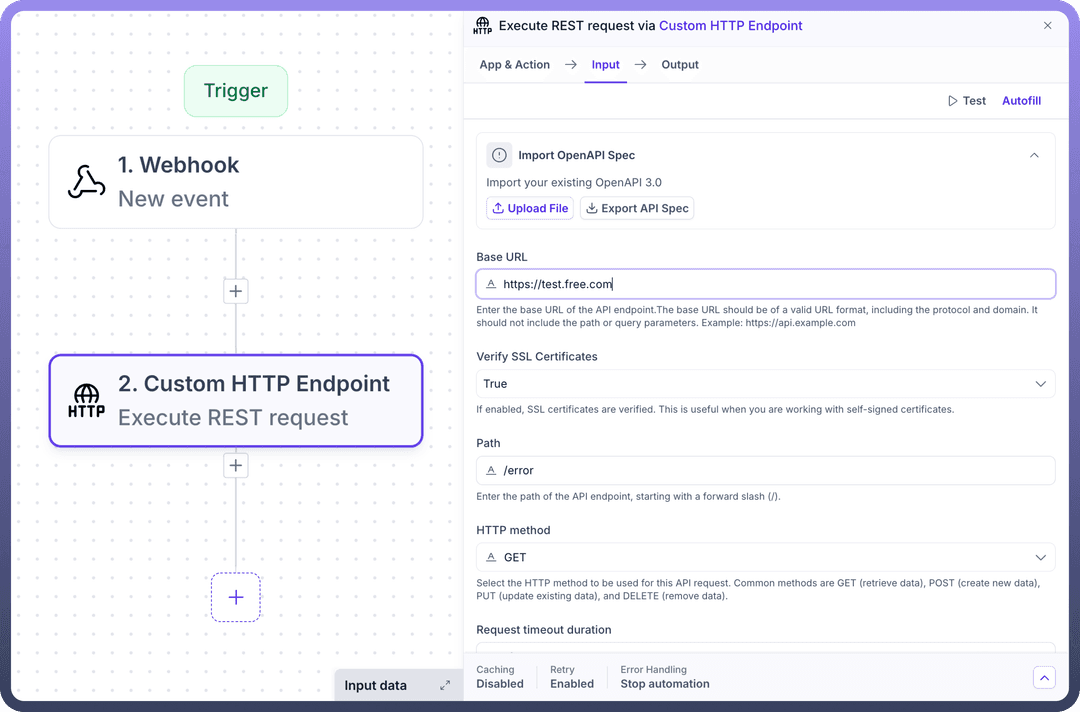
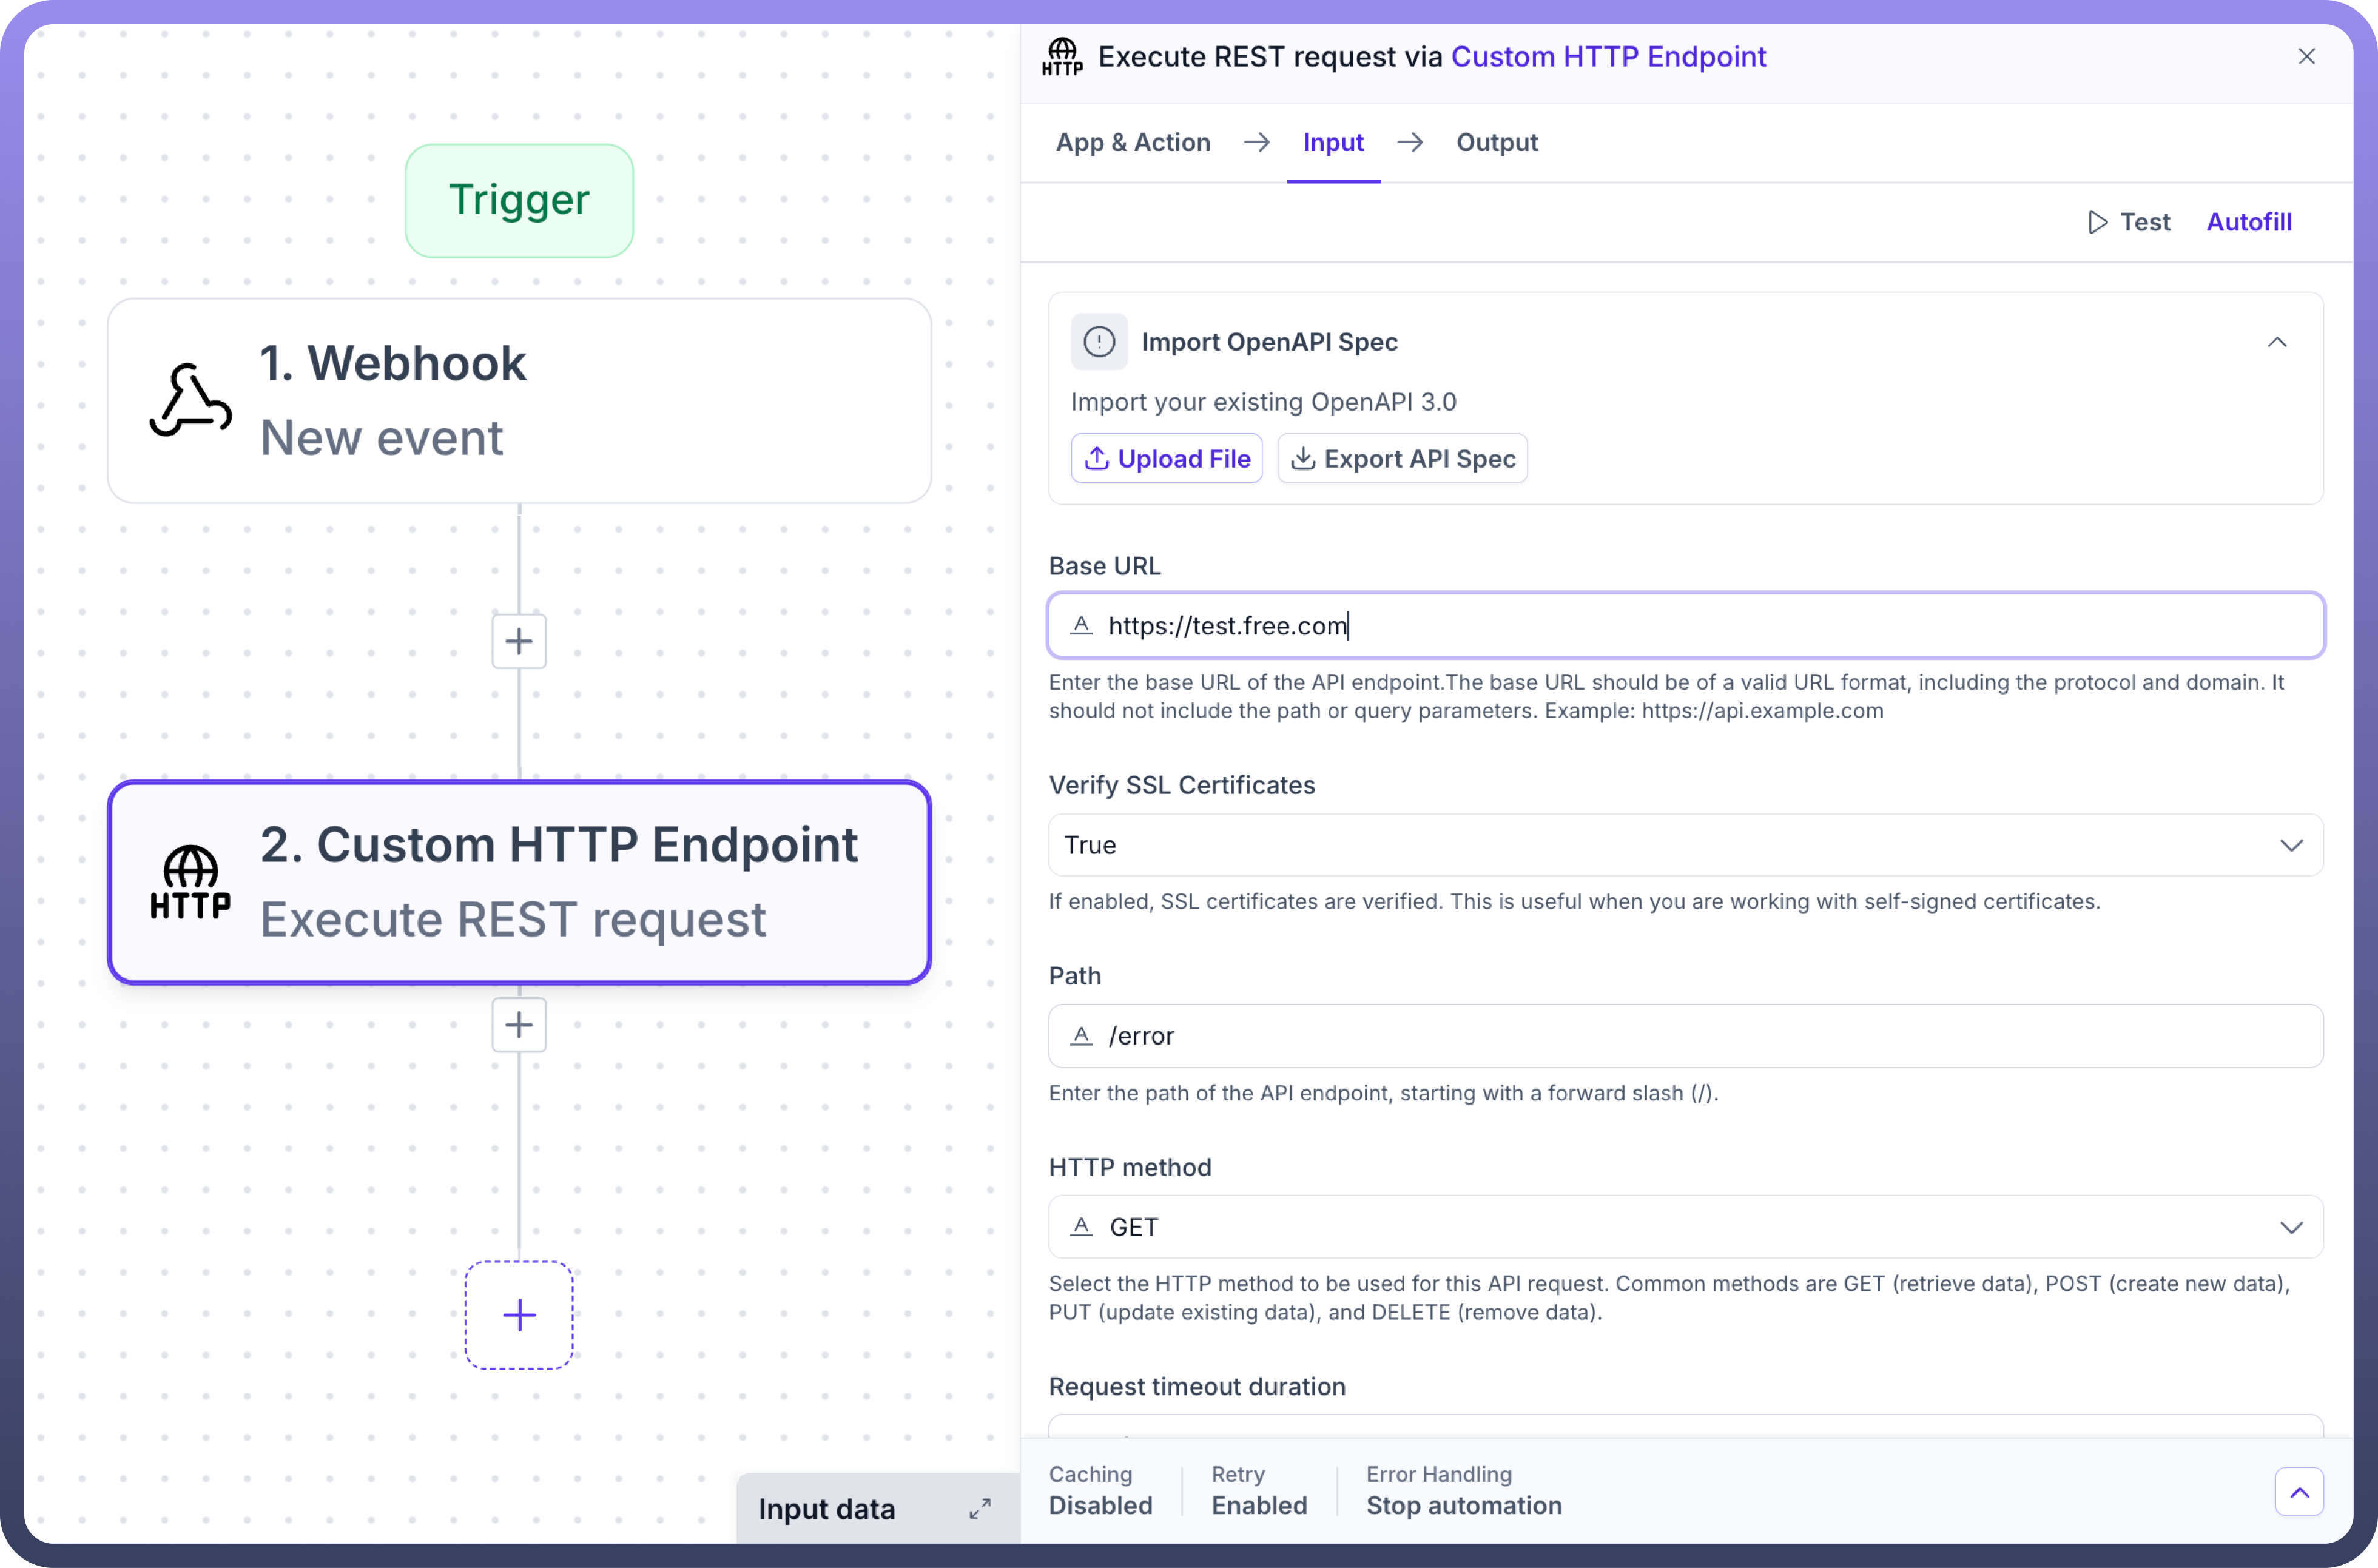
5. Custom HTTP Endpoint
UnifyApps provides flexibility to connect to any external system or service that supports HTTP using Custom Actions. This feature empowers you to integrate with APIs that may not have native connectors in UnifyApps.
Capabilities
Connect to Any System: Send and receive data via HTTP methods
Leverage Custom APIs: Interact with custom or third-party APIs
Design Flexible Integrations: Use dynamic inputs, headers, and parameters
Setting Up an HTTP Endpoint
Configure the HTTP Action:
Enter the Endpoint URL
Choose an HTTP Method:
GET: Retrieve data from an API
POST: Send data to create or update a resource
PUT: Update an existing resource
DELETE: Remove a resource
Customize Request Details:
Headers: Add custom headers (Authorization, Content-Type)
Query Parameters: Include required parameters for GET requests
Body: Define data payload for POST or PUT requests
Dynamic Data Handling
Dynamic Input Mapping: Use data pills for headers, parameters, or body fields
Dynamic Output Parsing: Parse responses using JSON paths or built-in features
Best Practices
Use Secure Connections: Always use HTTPS
Test API Calls: Validate HTTP configurations
Monitor API Usage: Review logs regularly
.png&w=1080&q=75)
.png)
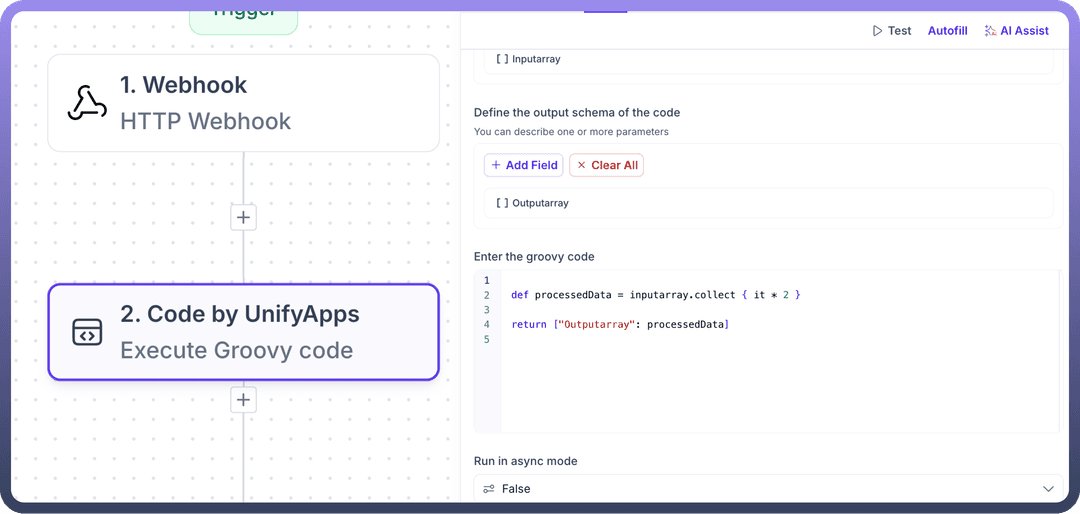
6. Code by UnifyApps
The Code by UnifyApps feature enables custom code execution within automation workflows, supporting multiple programming languages and providing flexible data transformations and integrations.
Key Features
Multi-Language Support
Groovy
Java
JavaScript
Python
.png&w=1080&q=75)
.png)
Custom Input/Output Handling
Define custom input parameters
Map output schema dynamically
Asynchronous Execution
Supports both synchronous and asynchronous runs
Implementation Guide
Select Code by UnifyApps:
Navigate to Code by UnifyApps
Select appropriate language-specific action
Define Inputs:
Add parameters for input variables
Use Map from Step for dynamic data linking
Define Outputs:
Specify output schema
Add output parameters as needed
Write Custom Code:
Use code editor for custom logic
Utilize AI assist or snippets
Configure Async Mode:
Set Run in async mode for non-blocking execution
Disable for synchronous execution
Use Cases
Data Transformation:
Transform complex datasets
Preprocess data for workflows
Web Scraping:
Automate browser actions
Fetch live data from websites
Custom Integration Logic:
Connect to third-party APIs
Process and insert results into workflows
Testing and Validation
Test code snippets before deployment
Monitor real-time results and logs
Validate parameters and outputs
Input Assistance Features
UnifyApps provides smart input assistance to help you work more efficiently when building automations.
Suggested Input
A smart suggestion system that:
Shows matching variables from your current automation
Displays the complete path of the variable (e.g., Webhook → Body → CustomerID)
Helps prevent errors by showing only valid options
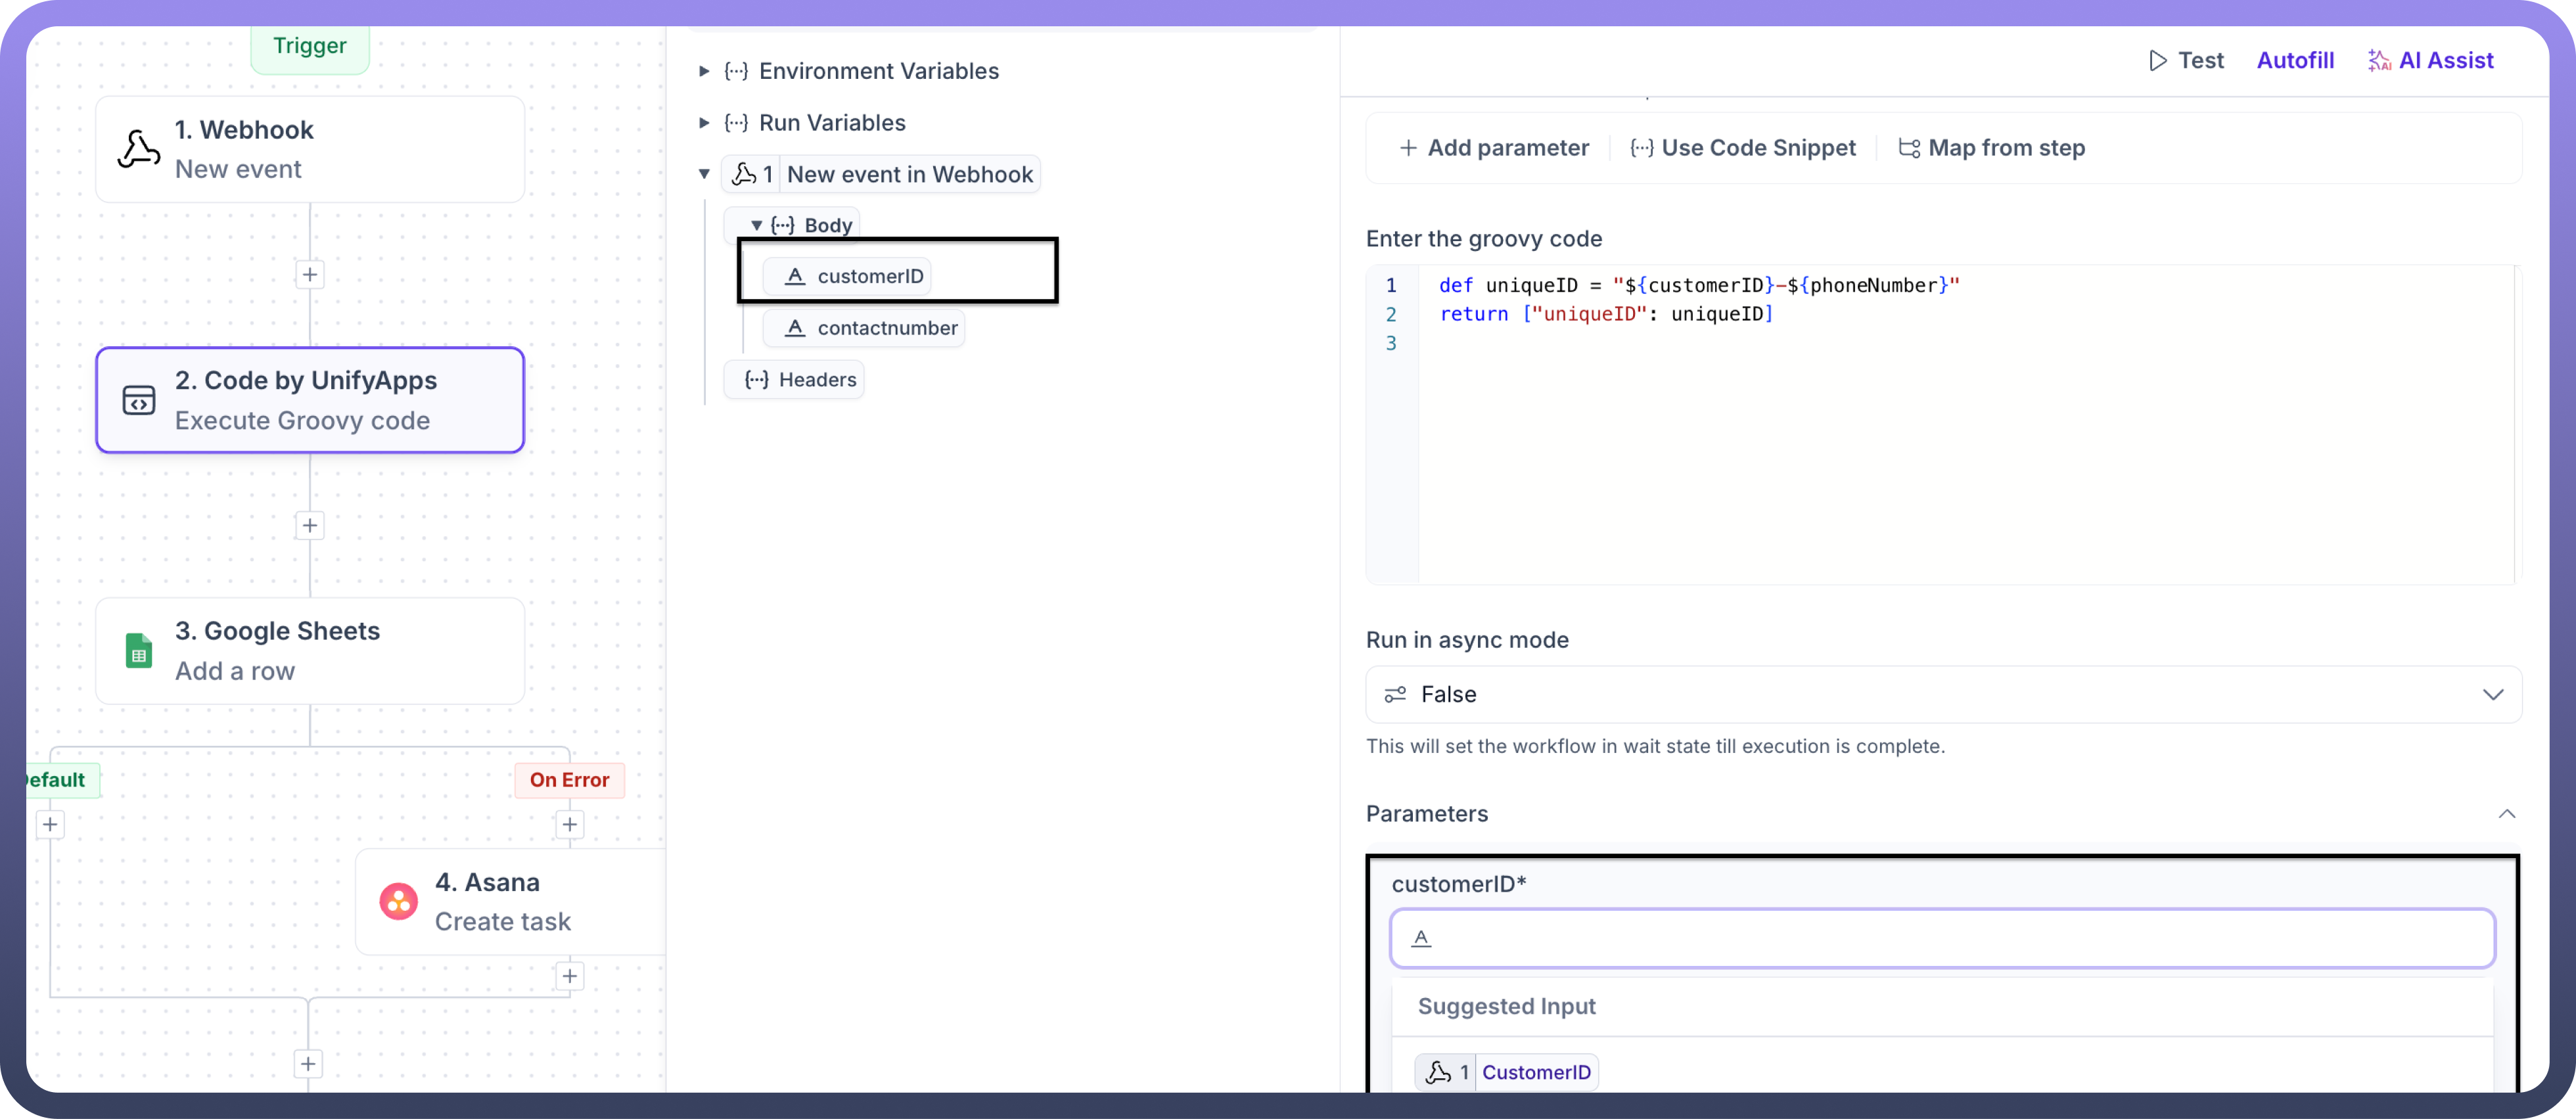
Autofill
An intelligent auto-completion feature that:
Automatically fills in variables based on matching keywords
Works with variables already created in your automation
If multiple matches are found, prompts you to select the correct variable
Shows the full variable path for better context
Example: When naming a parameter "Priority", the system will:
Scan existing variables containing "Priority"
Single match → Autofills automatically
Multiple matches → Provides selection dropdown
Shows variable path (Webhook → Body → CustomerID) for clarity
.png&w=1080&q=75)
.png)
These features enhance automation development by:
Reducing manual typing errors
Saving development time
Ensuring variable consistency
Providing clear variable context